Coginiti Retail Project Complete Workflow Tutorial
Overview
This tutorial walks you through the complete coginiti-retail data pipeline — from raw source data to automated, scheduled reports — using Coginiti Actions.
You will explore each layer of the pipeline, understand how data quality tests are embedded at every step, and orchestrate everything into an automated workflow.
Scenario: Publishing Retail Analytics Pipeline
You're part of a data team working on a retail analytics pipeline.
The challenge: The team needs a reliable, automated pipeline that transforms raw retail data into business reports, with quality checks at every layer and flexible reporting that stakeholders can customize.
Coginiti Actions solves this by allowing you to:
- Define multi-step data pipelines as reusable actions
- Embed automated testing directly inside each transformation step
- Create parameterized reports that run on schedules
- Orchestrate everything through a single workflow with job dependencies
This guide is based on PostgreSQL DB
Step 1: Reviewing Pipeline Scripts
Context: You need to build a three-layer data pipeline (landing → base → mart) that processes retail transaction data. Each layer is a separate run script so they can be reviewed, tested, and orchestrated independently.
Prerequisites
Before running the pipeline, ensure you have:
- A
coginiti-retail-tutorialproject
Available here: https://github.com/coginiti-dev/coginiti-retail-tutorial
Read the _instructions file first
- PostgreSQL DB named
retail_csl - Database schemas created:
landing,stage,base,mart,reports - Write access to the project
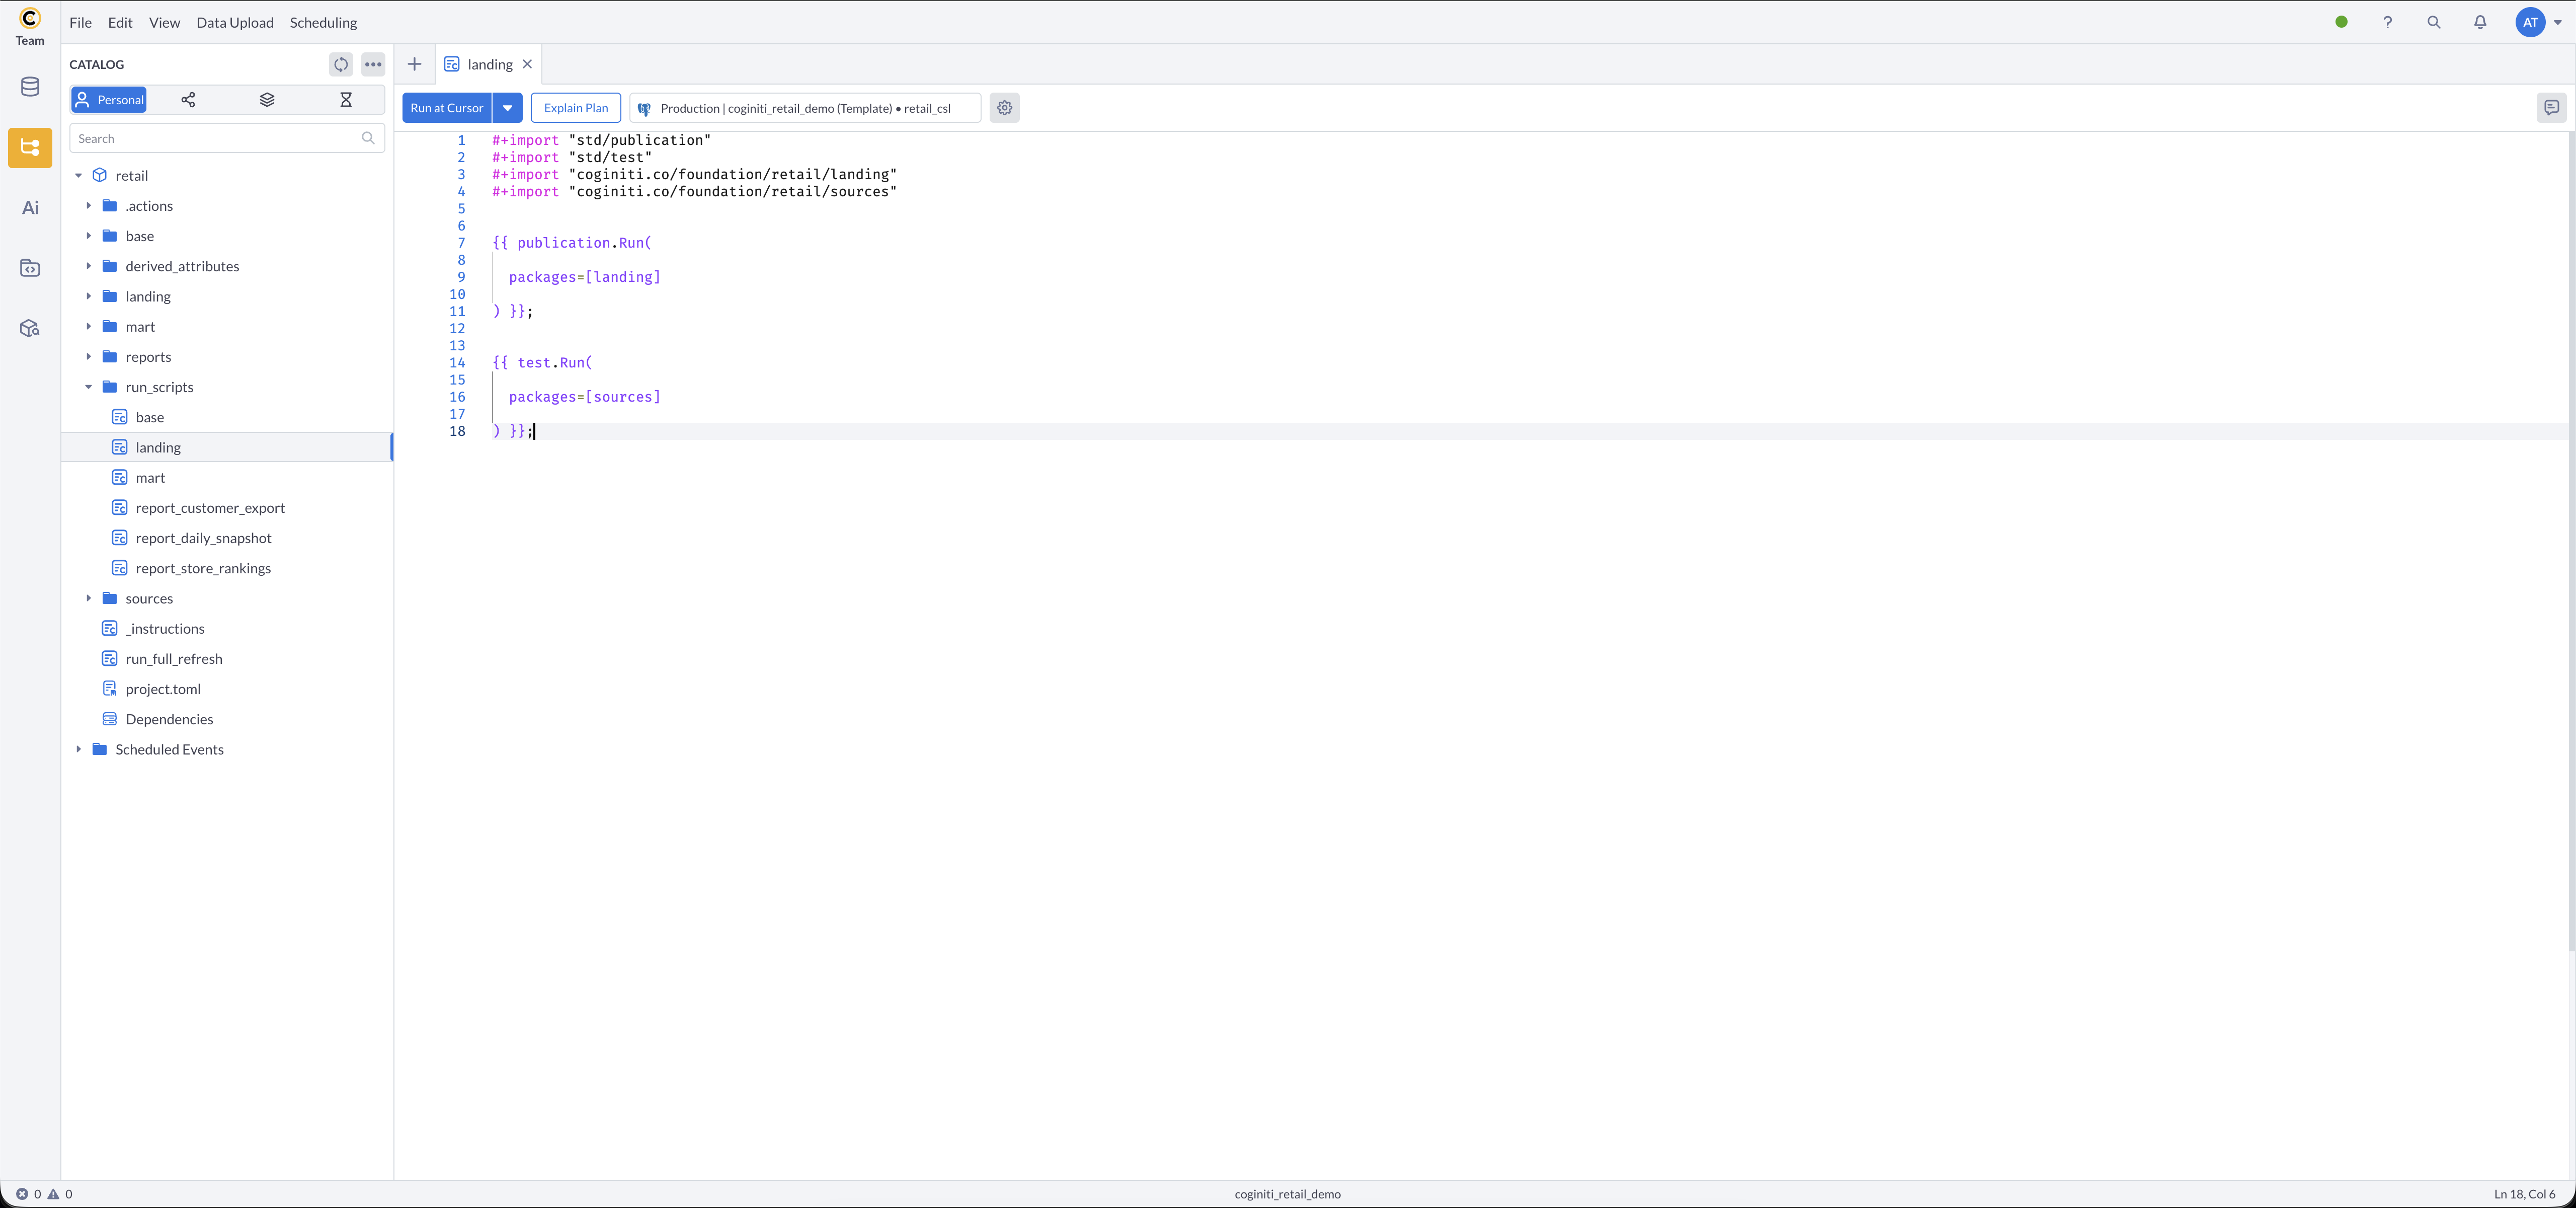
Reviewing the Landing Layer Script
Starting with the simplest run script that populates raw data tables.
- Navigate to the project's
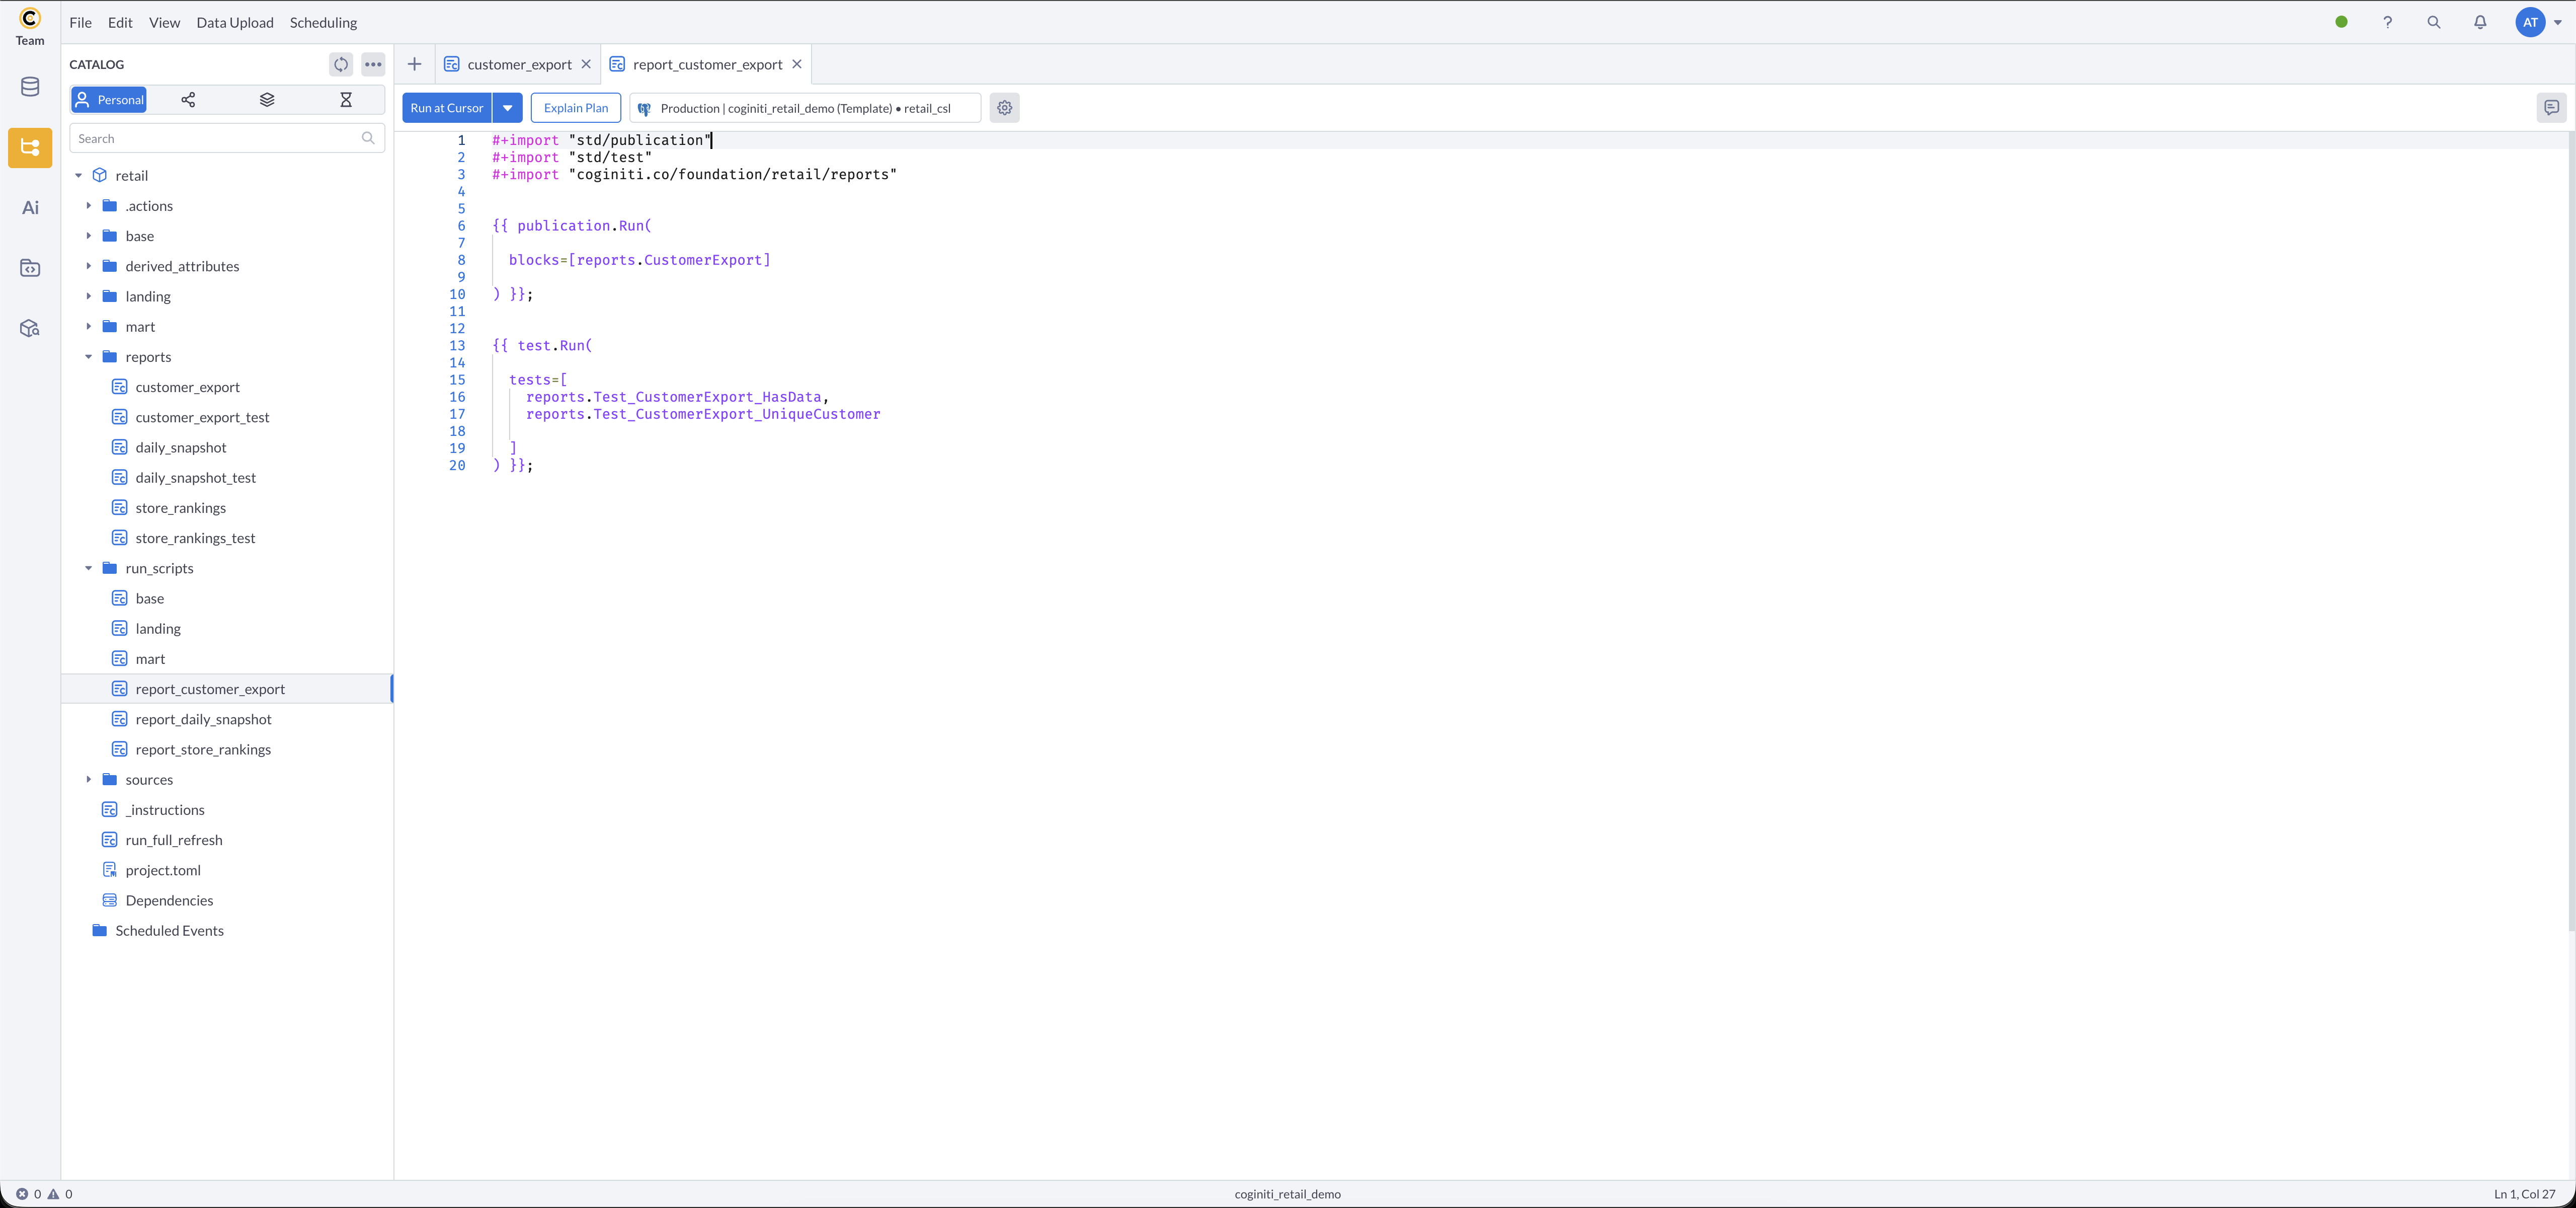
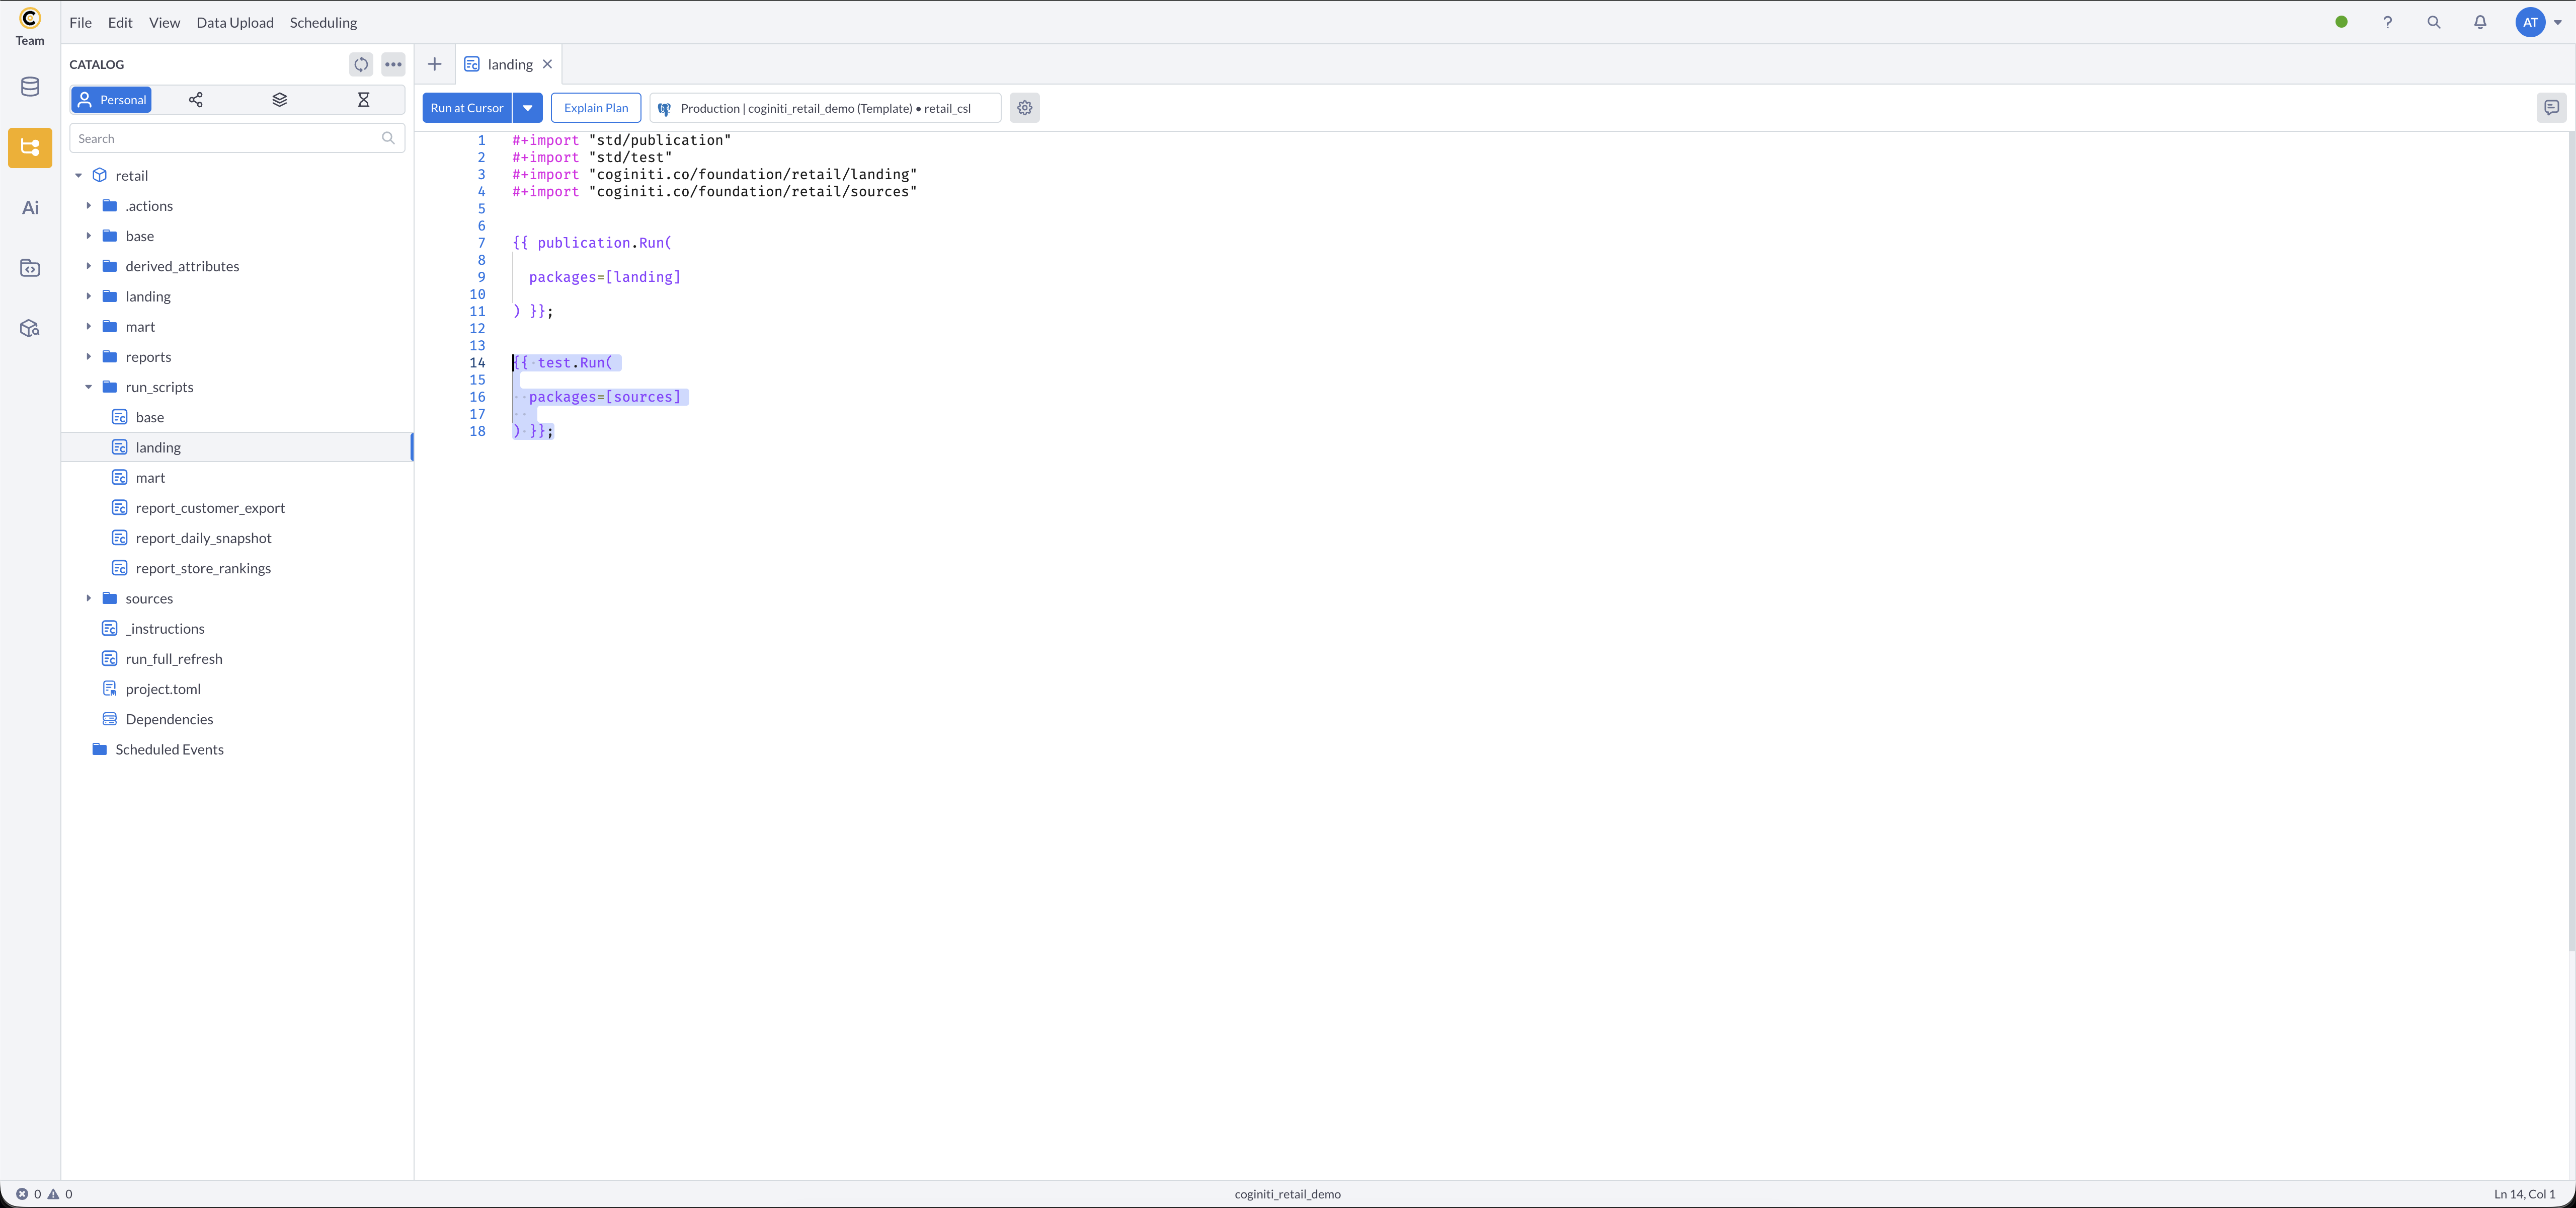
run_scripts/folder in Coginiti - Open the landing asset
- What this does:
publication.Run()finds all entities in the landing package with publication metadata and creates or replaces their target tables in the database.
After publishing,test.Run()automatically validates all source data entities.
More about publications: Publication — Coginiti Script Reference
More about tests: Tests — Coginiti Script Reference
Tests in-depth tutorial: Building Data Quality Tests with CoginitiScript
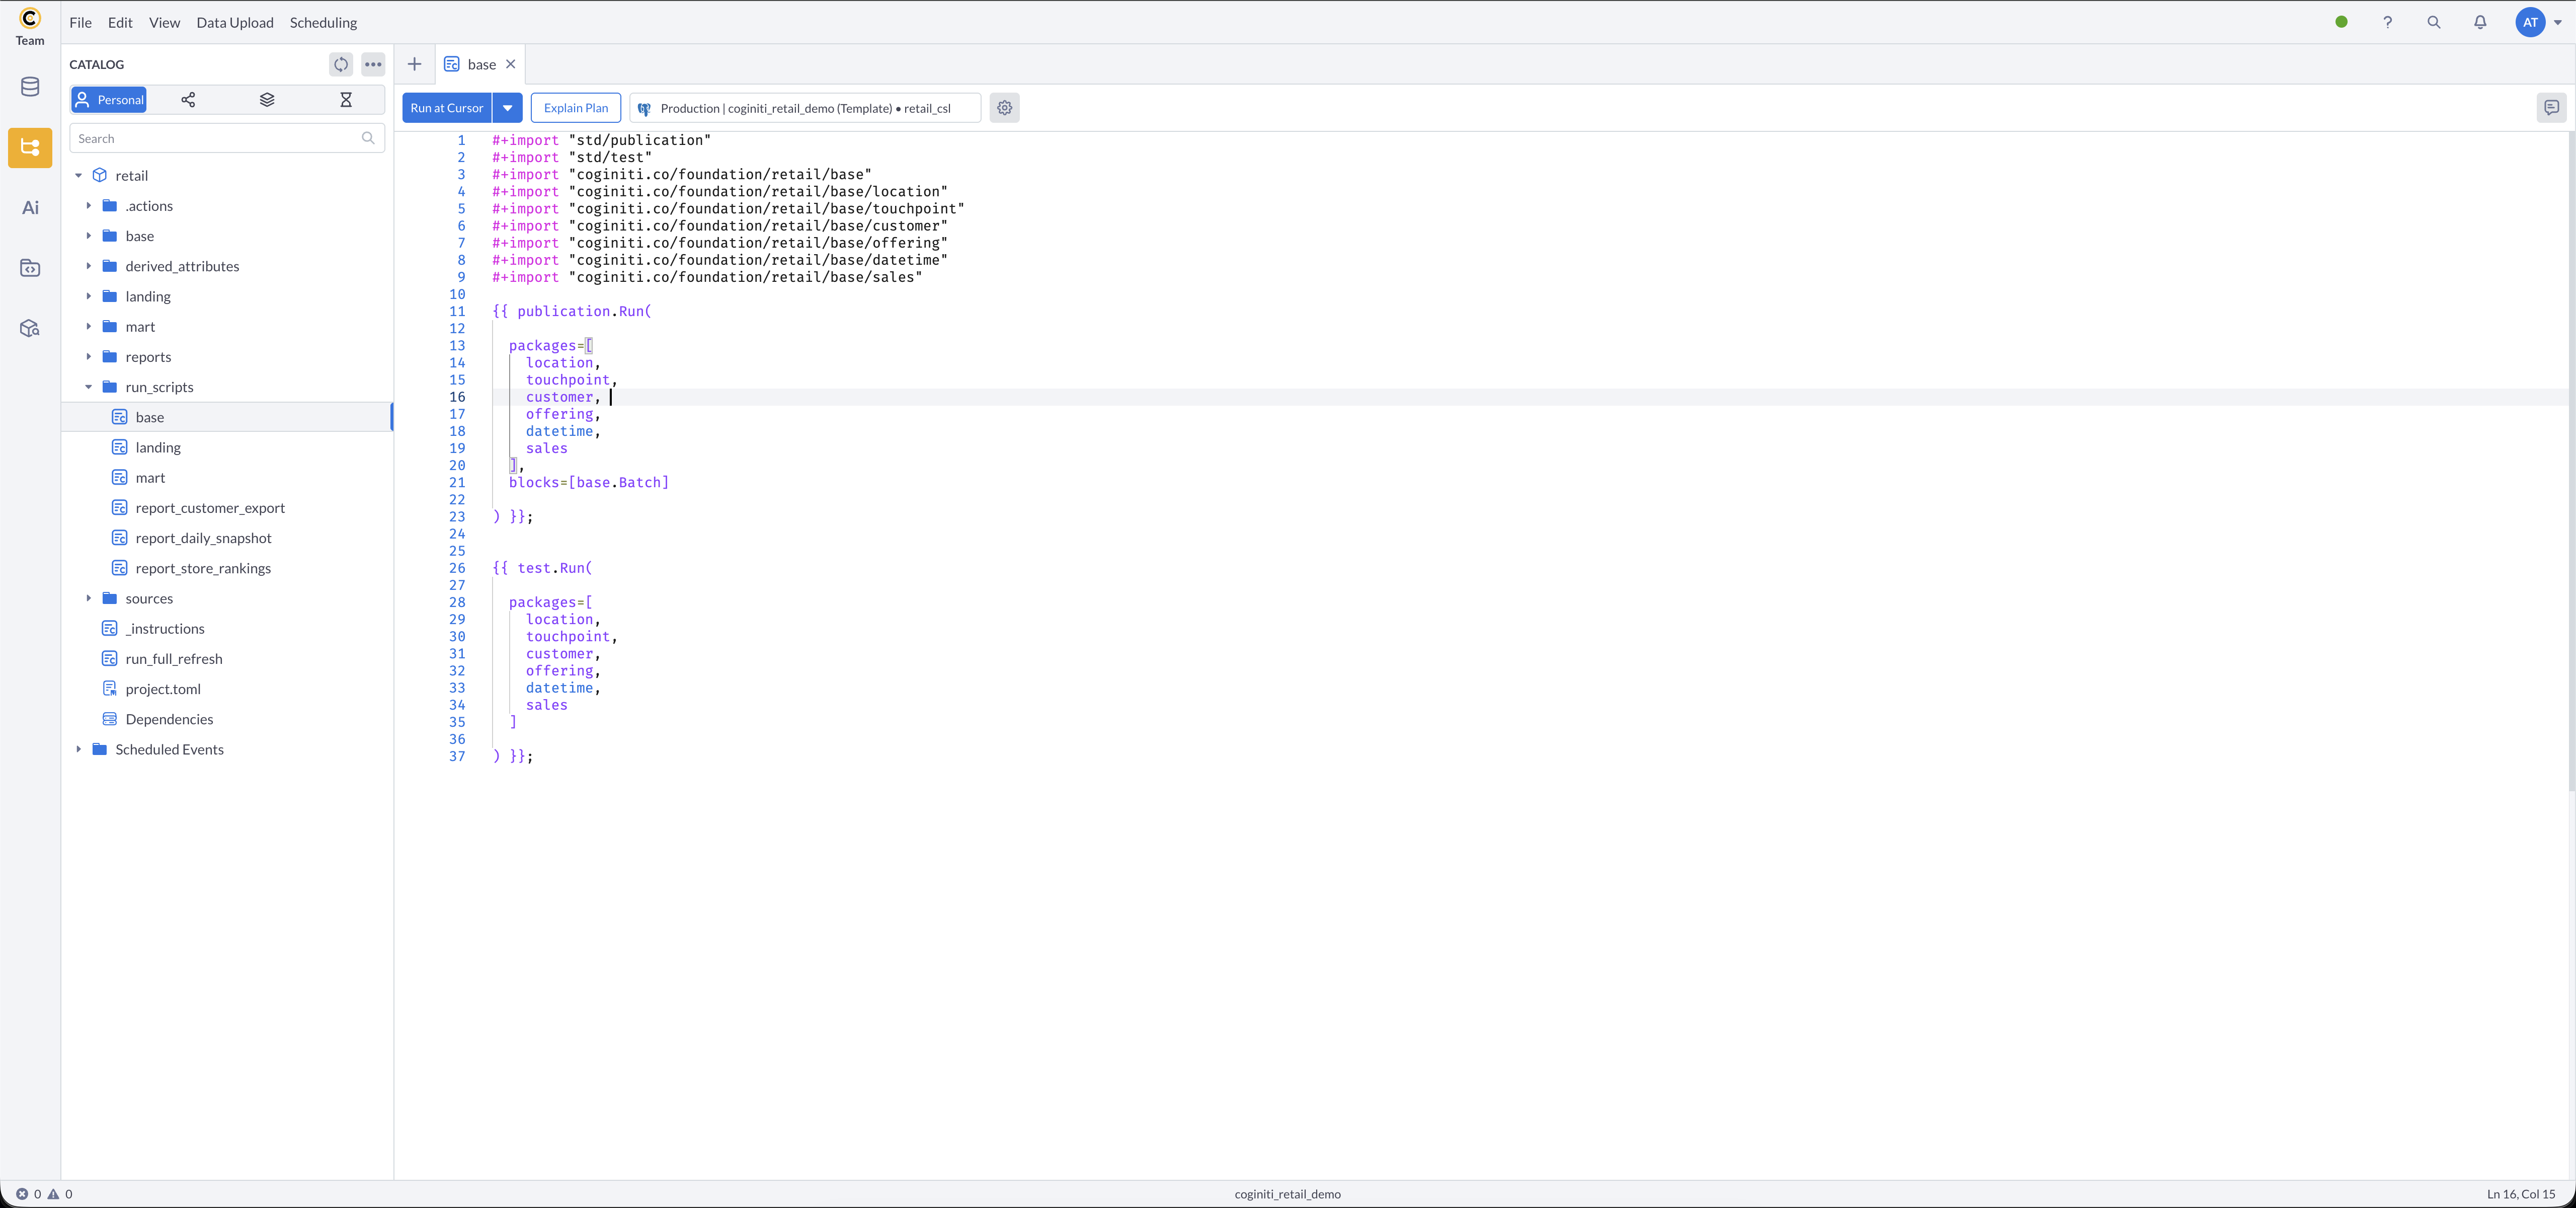
Reviewing the Base Layer Script
Next, the base layer run script which includes batch tracking for audit trails.
- In the
run_scripts/folder, open base - What this does:
publication.Run()finds all entities across the base sub-packages (location,touchpoint,customer,offering,datetime,sales) with publication metadata and creates or replaces their tables.
Theblocks=[base.Batch]parameter creates a batch record before processing, stamping every row with a batch number for data lineage tracking.
After publishing,test.Run()validates all base layer entities automatically.
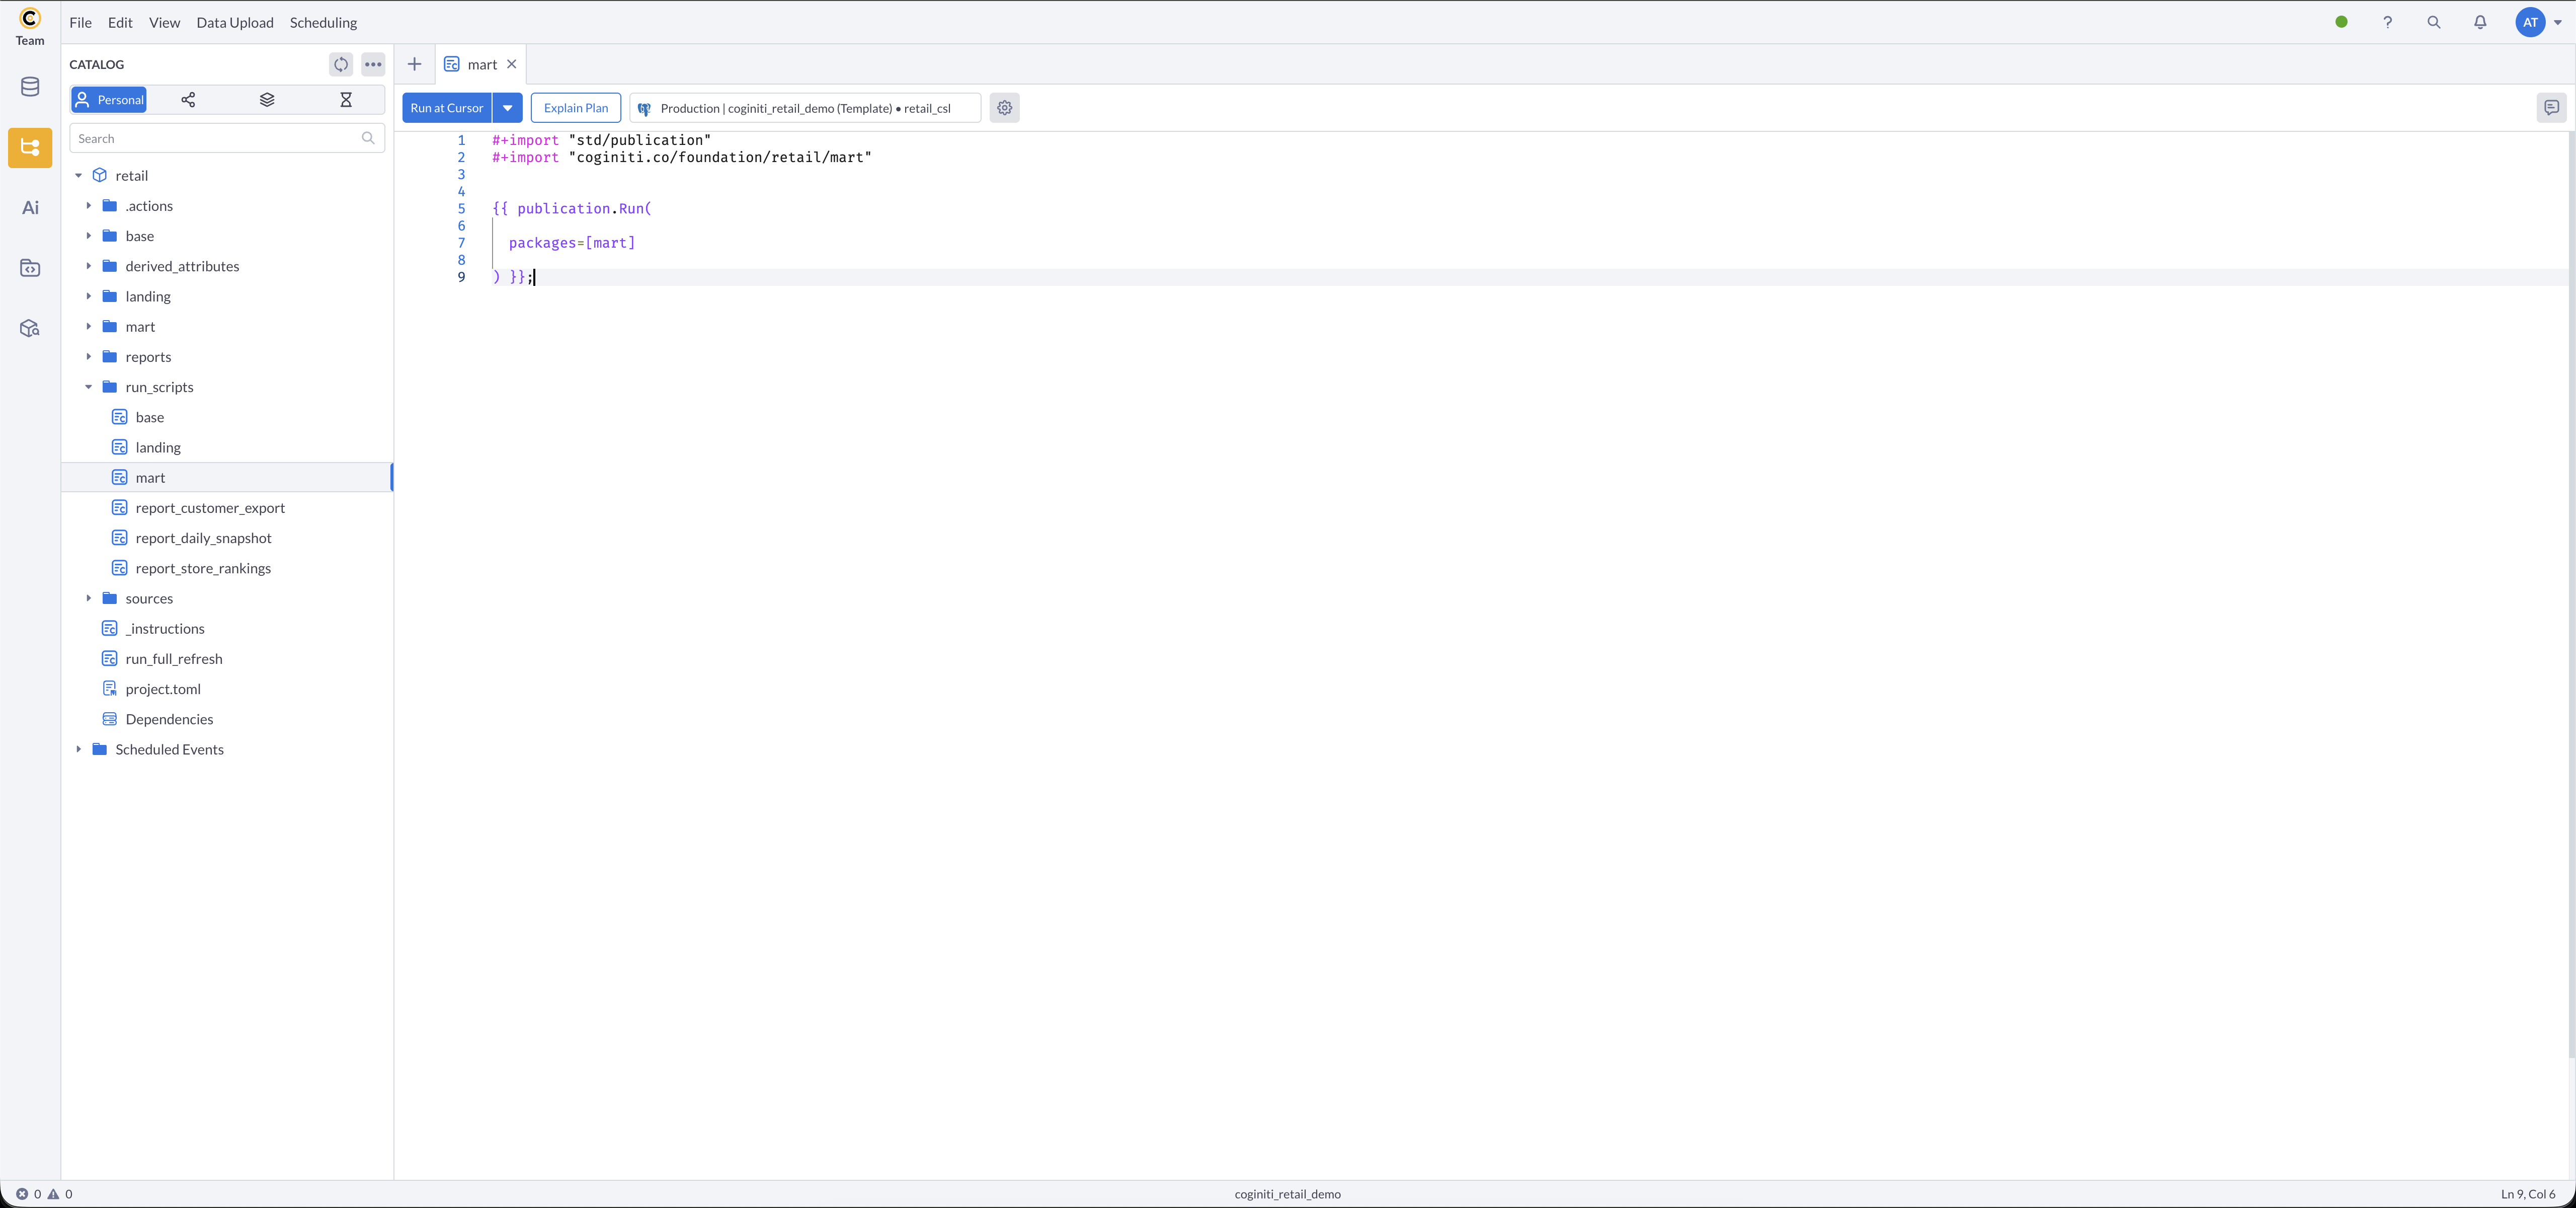
Reviewing the Mart Layer Script
Finally, the mart layer run script for analytics-ready tables.
- Open mart in the
run_scripts/folder - What this does:
publication.Run()finds all entities in the mart package with publication metadata and creates or replaces their tables in the database.
Running Scripts Manually
To test each layer independently:
- Run each run script in sequence:
- Load landing layer: open landing asset → run
- Load base layer: open base asset → run
- Load mart layer: open mart asset → run
- Verify tables were created in each schema (
landing,base,mart)
Best Practices
- Keep scripts focused: one run script per layer makes debugging easier
- Import only what you need: explicit imports make dependencies clear
- Test incrementally: run each layer independently before orchestrating
Step 2: Reviewing Parameterized Reports
Context: Reports need to be flexible — stakeholders run the same report with different date ranges, metrics, and filters. Parameterized run scripts accept runtime values and overwrite a "current state" table on each run.
Prerequisites
- Mart layer loaded with data
- Parameter values defined for each report
More about parameters in actions: Parameters — Coginiti Actions Reference
Reviewing the Daily Snapshot Report
Rolling window sales report with configurable lookback periods.
In the reports/ folder, open daily_snapshot:
Key parameters:
$snapshot_date— the date for the snapshot (e.g.,2023-01-01)$lookback_days— number of days to look back (e.g.,30)$snapshot_type— type of snapshot (daily,weekly,monthly)- Target table:
reports.rpt_daily_snapshot_current(overwrites on each run)
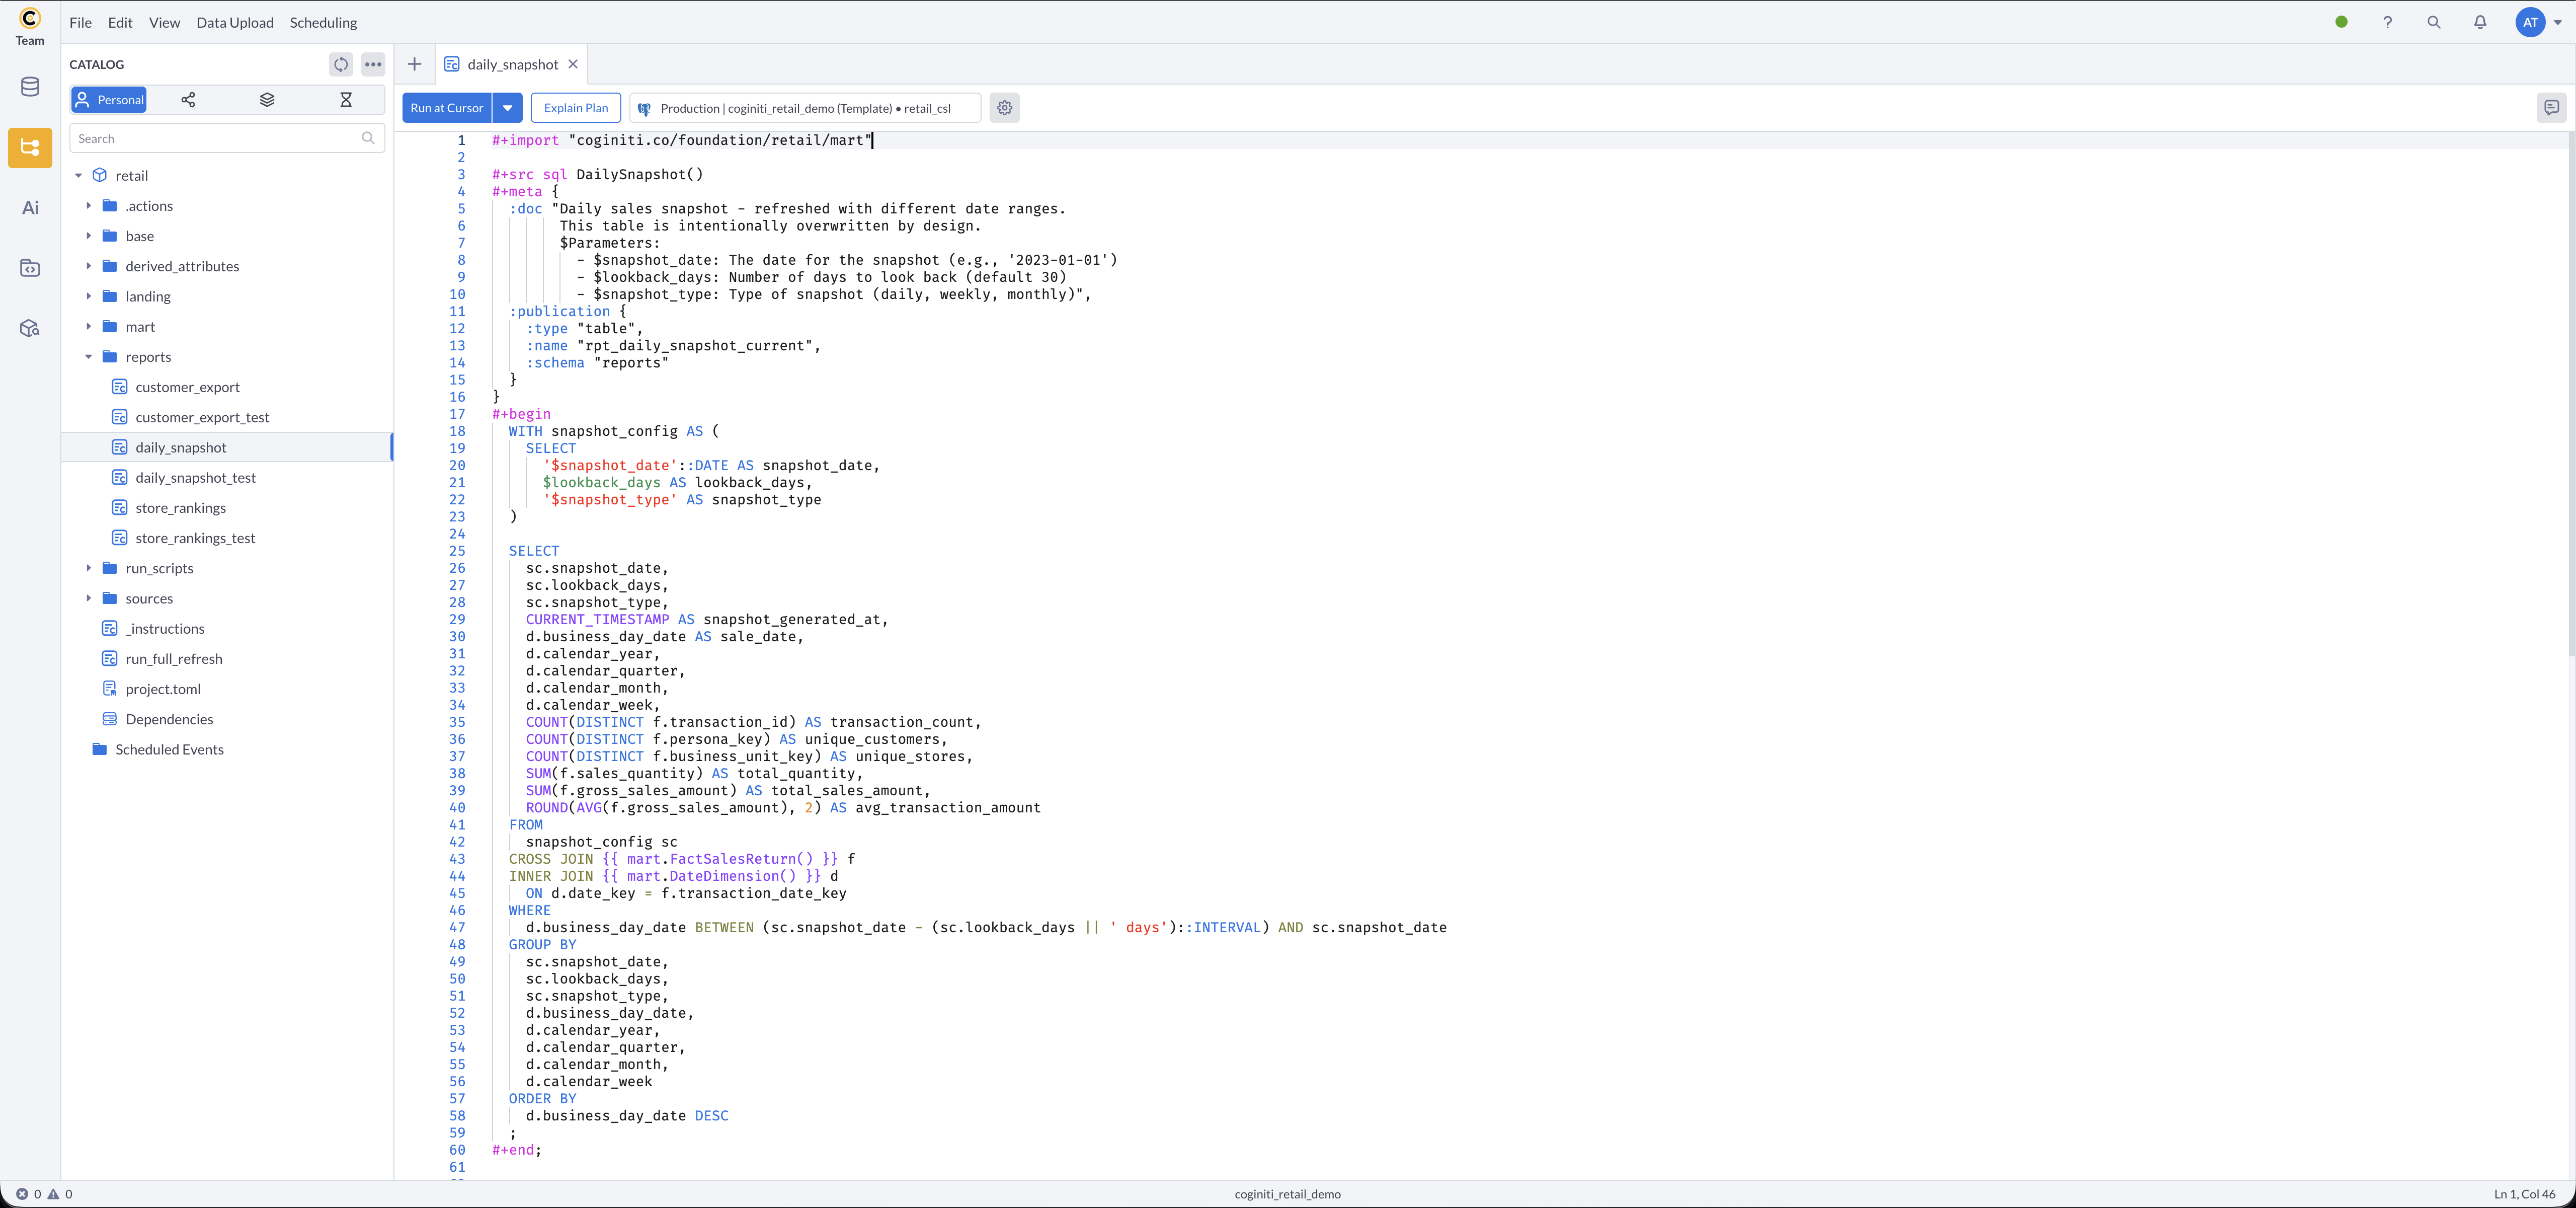
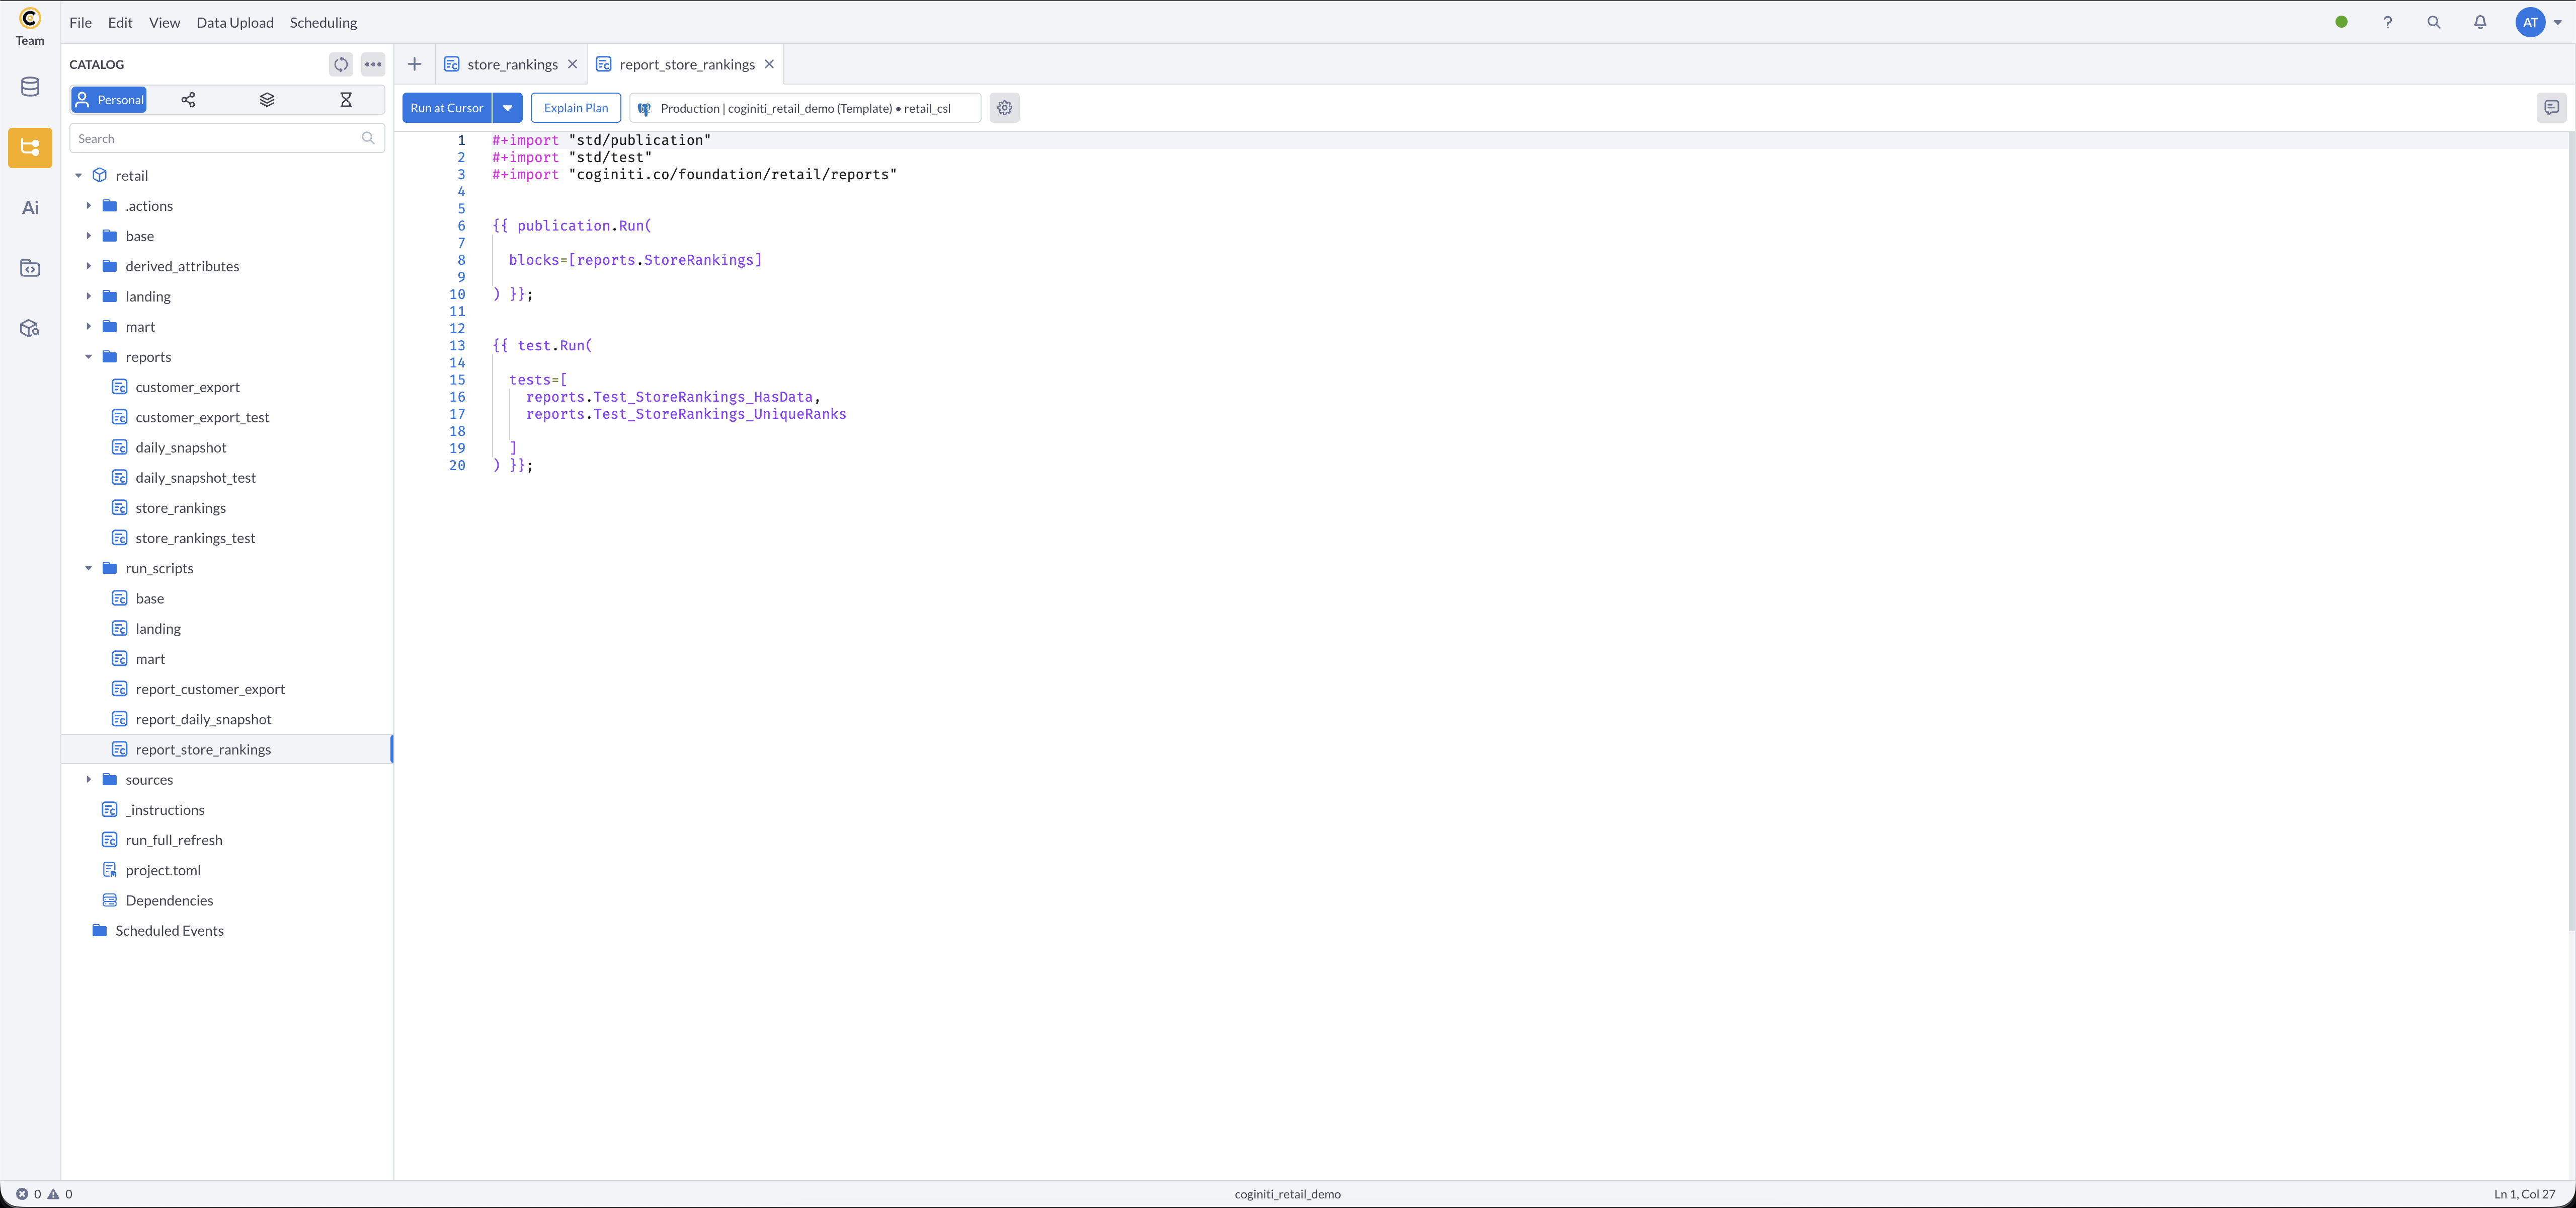
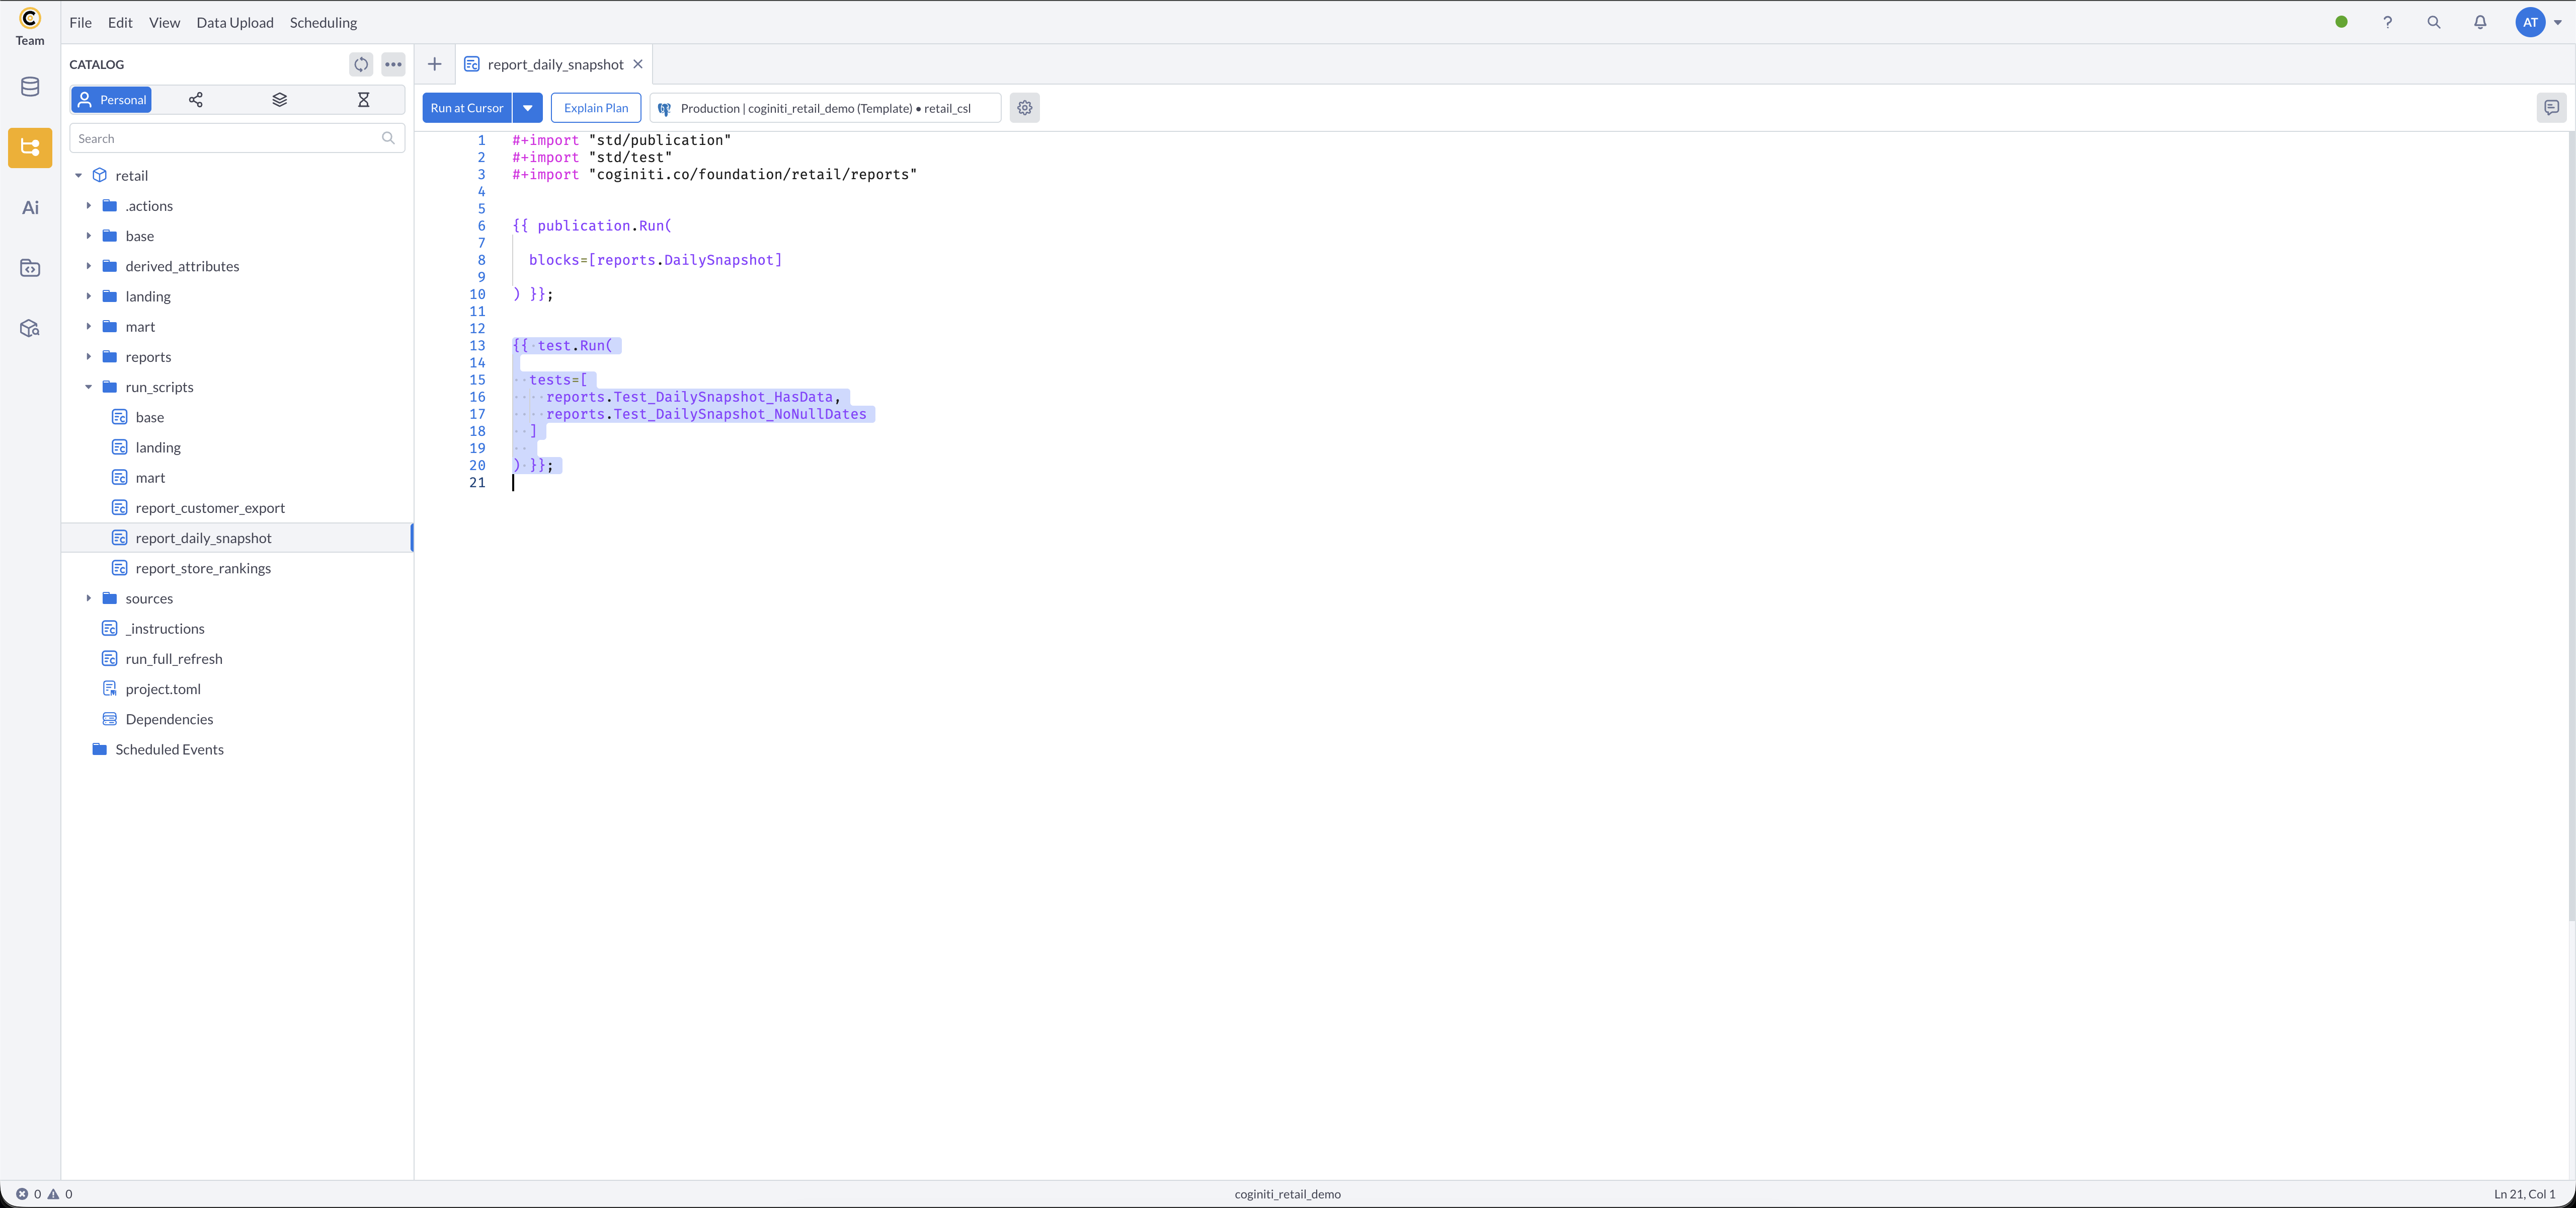
Reviewing the Report Run Script
- In the
run_scripts/folder, open report_daily_snapshot - What this does:
blocks=[reports.DailySnapshot]runs a specific entity rather than an entire package.
After publishing, targeted tests verify the snapshot contains data and has no null dates.

Reviewing the Store Rankings Report
Report that ranks stores by configurable metrics.
In the reports/ folder, open store_rankings:
Key parameters:
$start_date— start of the ranking period (e.g.,2022-01-01)$end_date— end of the ranking period (e.g.,2022-12-31)$ranking_metric— metric to rank by:sales_amount,transaction_count, orcustomer_count$top_n— number of top stores to include- Target table:
reports.rpt_store_rankings_current(overwrites on each run)
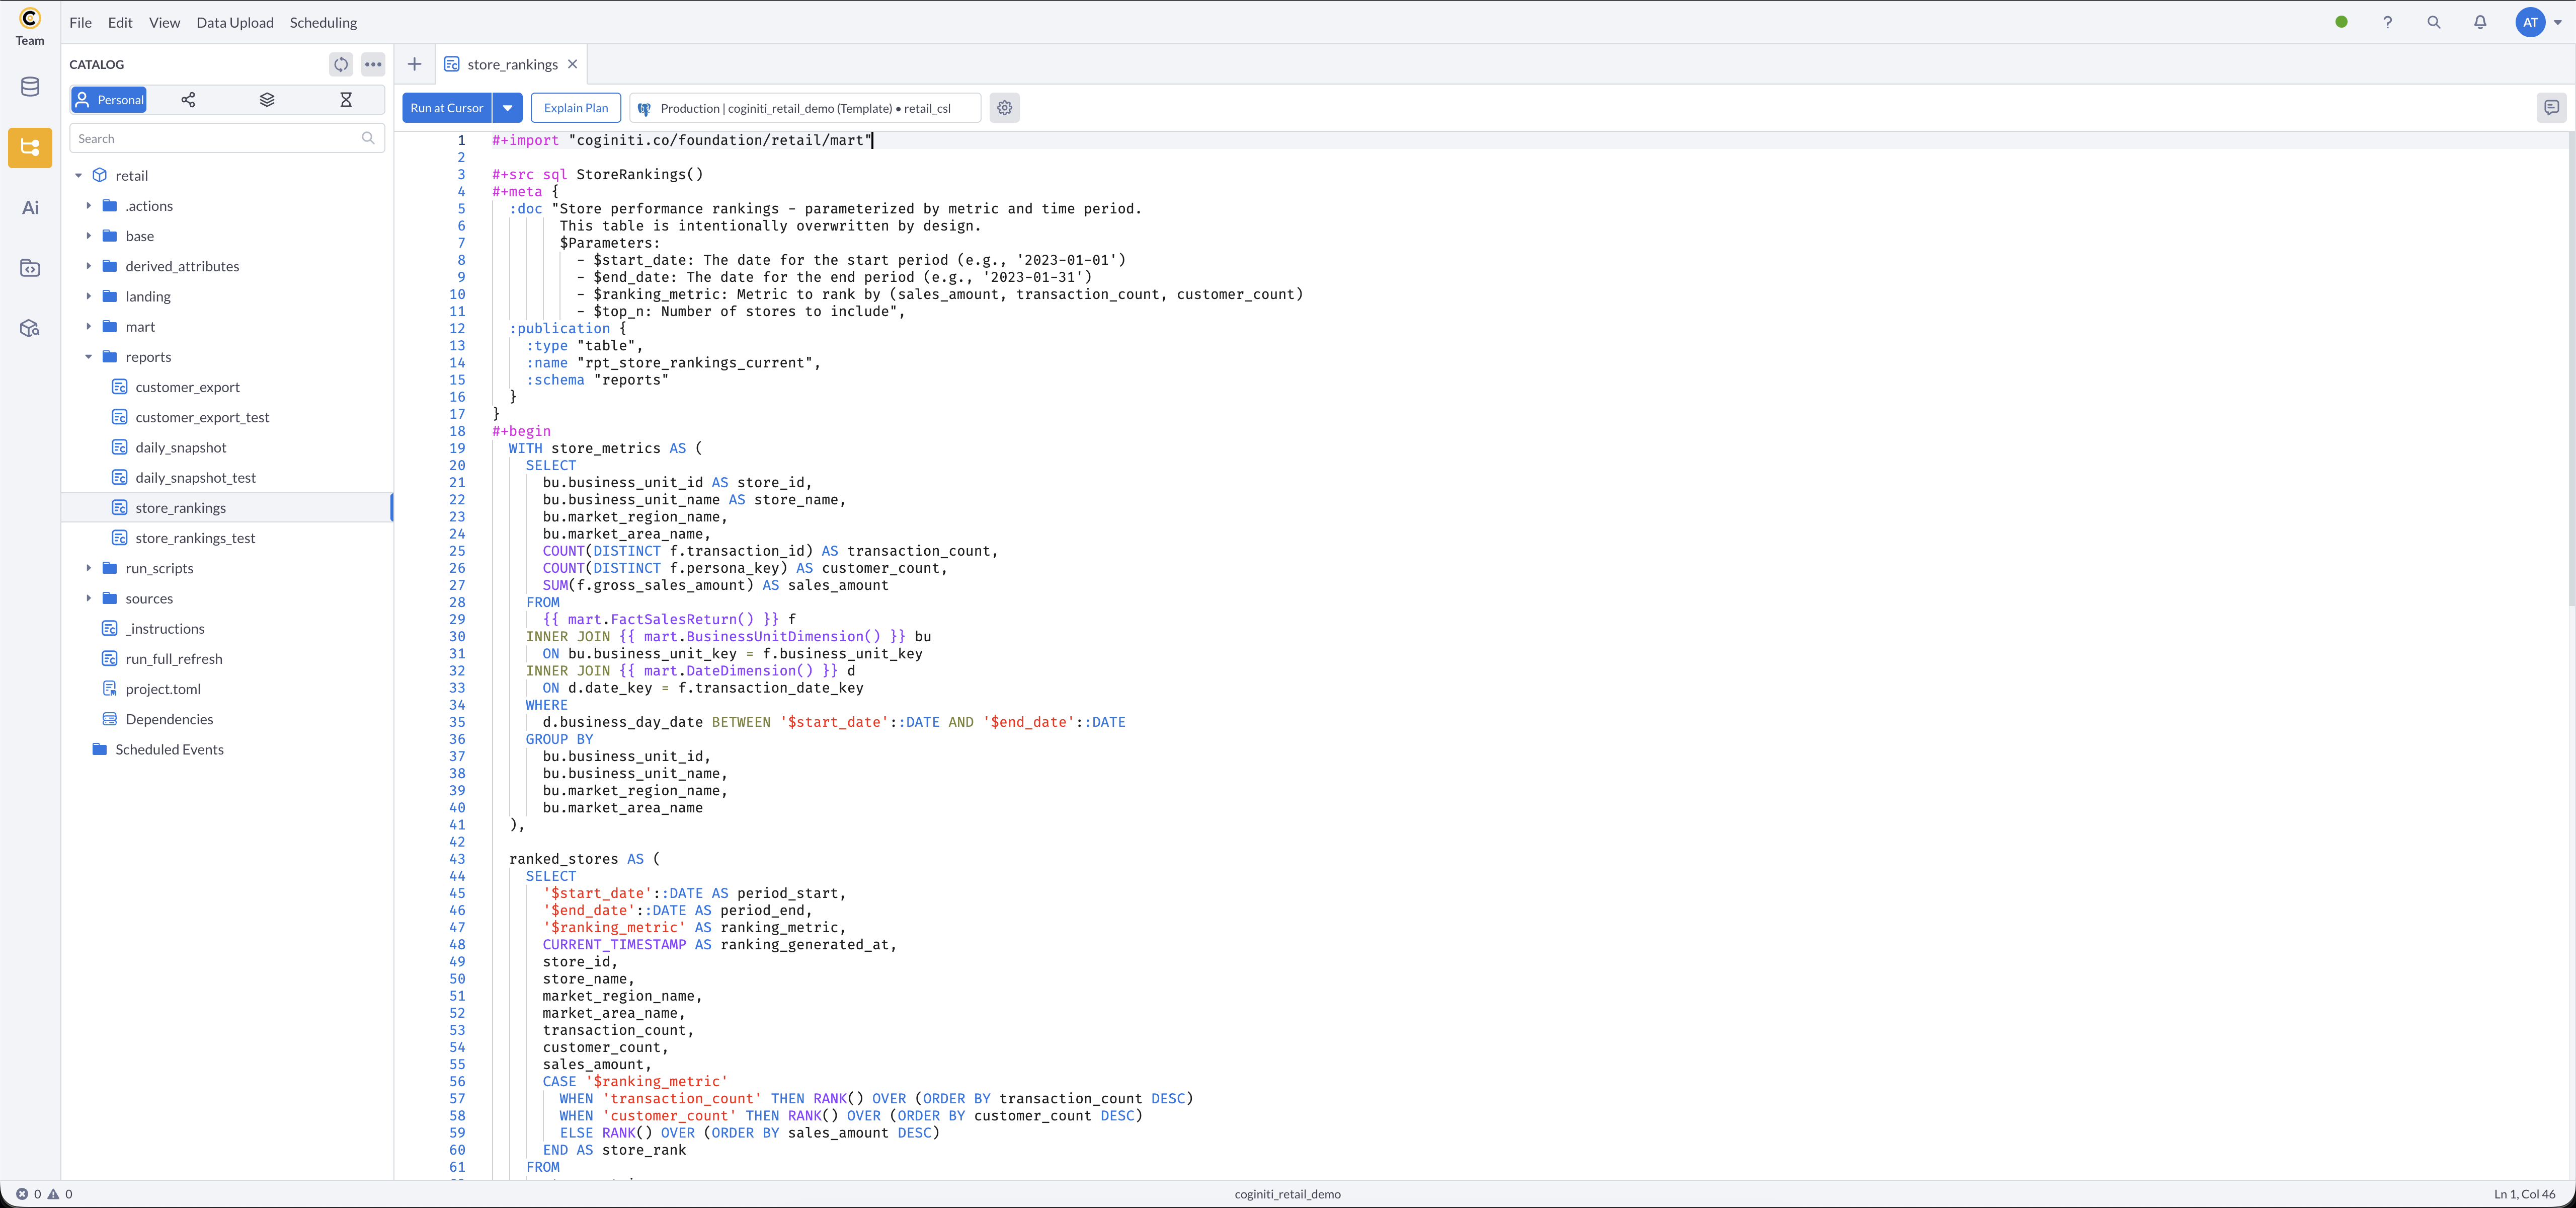
Reviewing the Report Run Script
- In
run_scripts/, open report_store_rankings - What this does: runs the
StoreRankingsentity specifically, then verifies the result has data and no duplicate ranks.
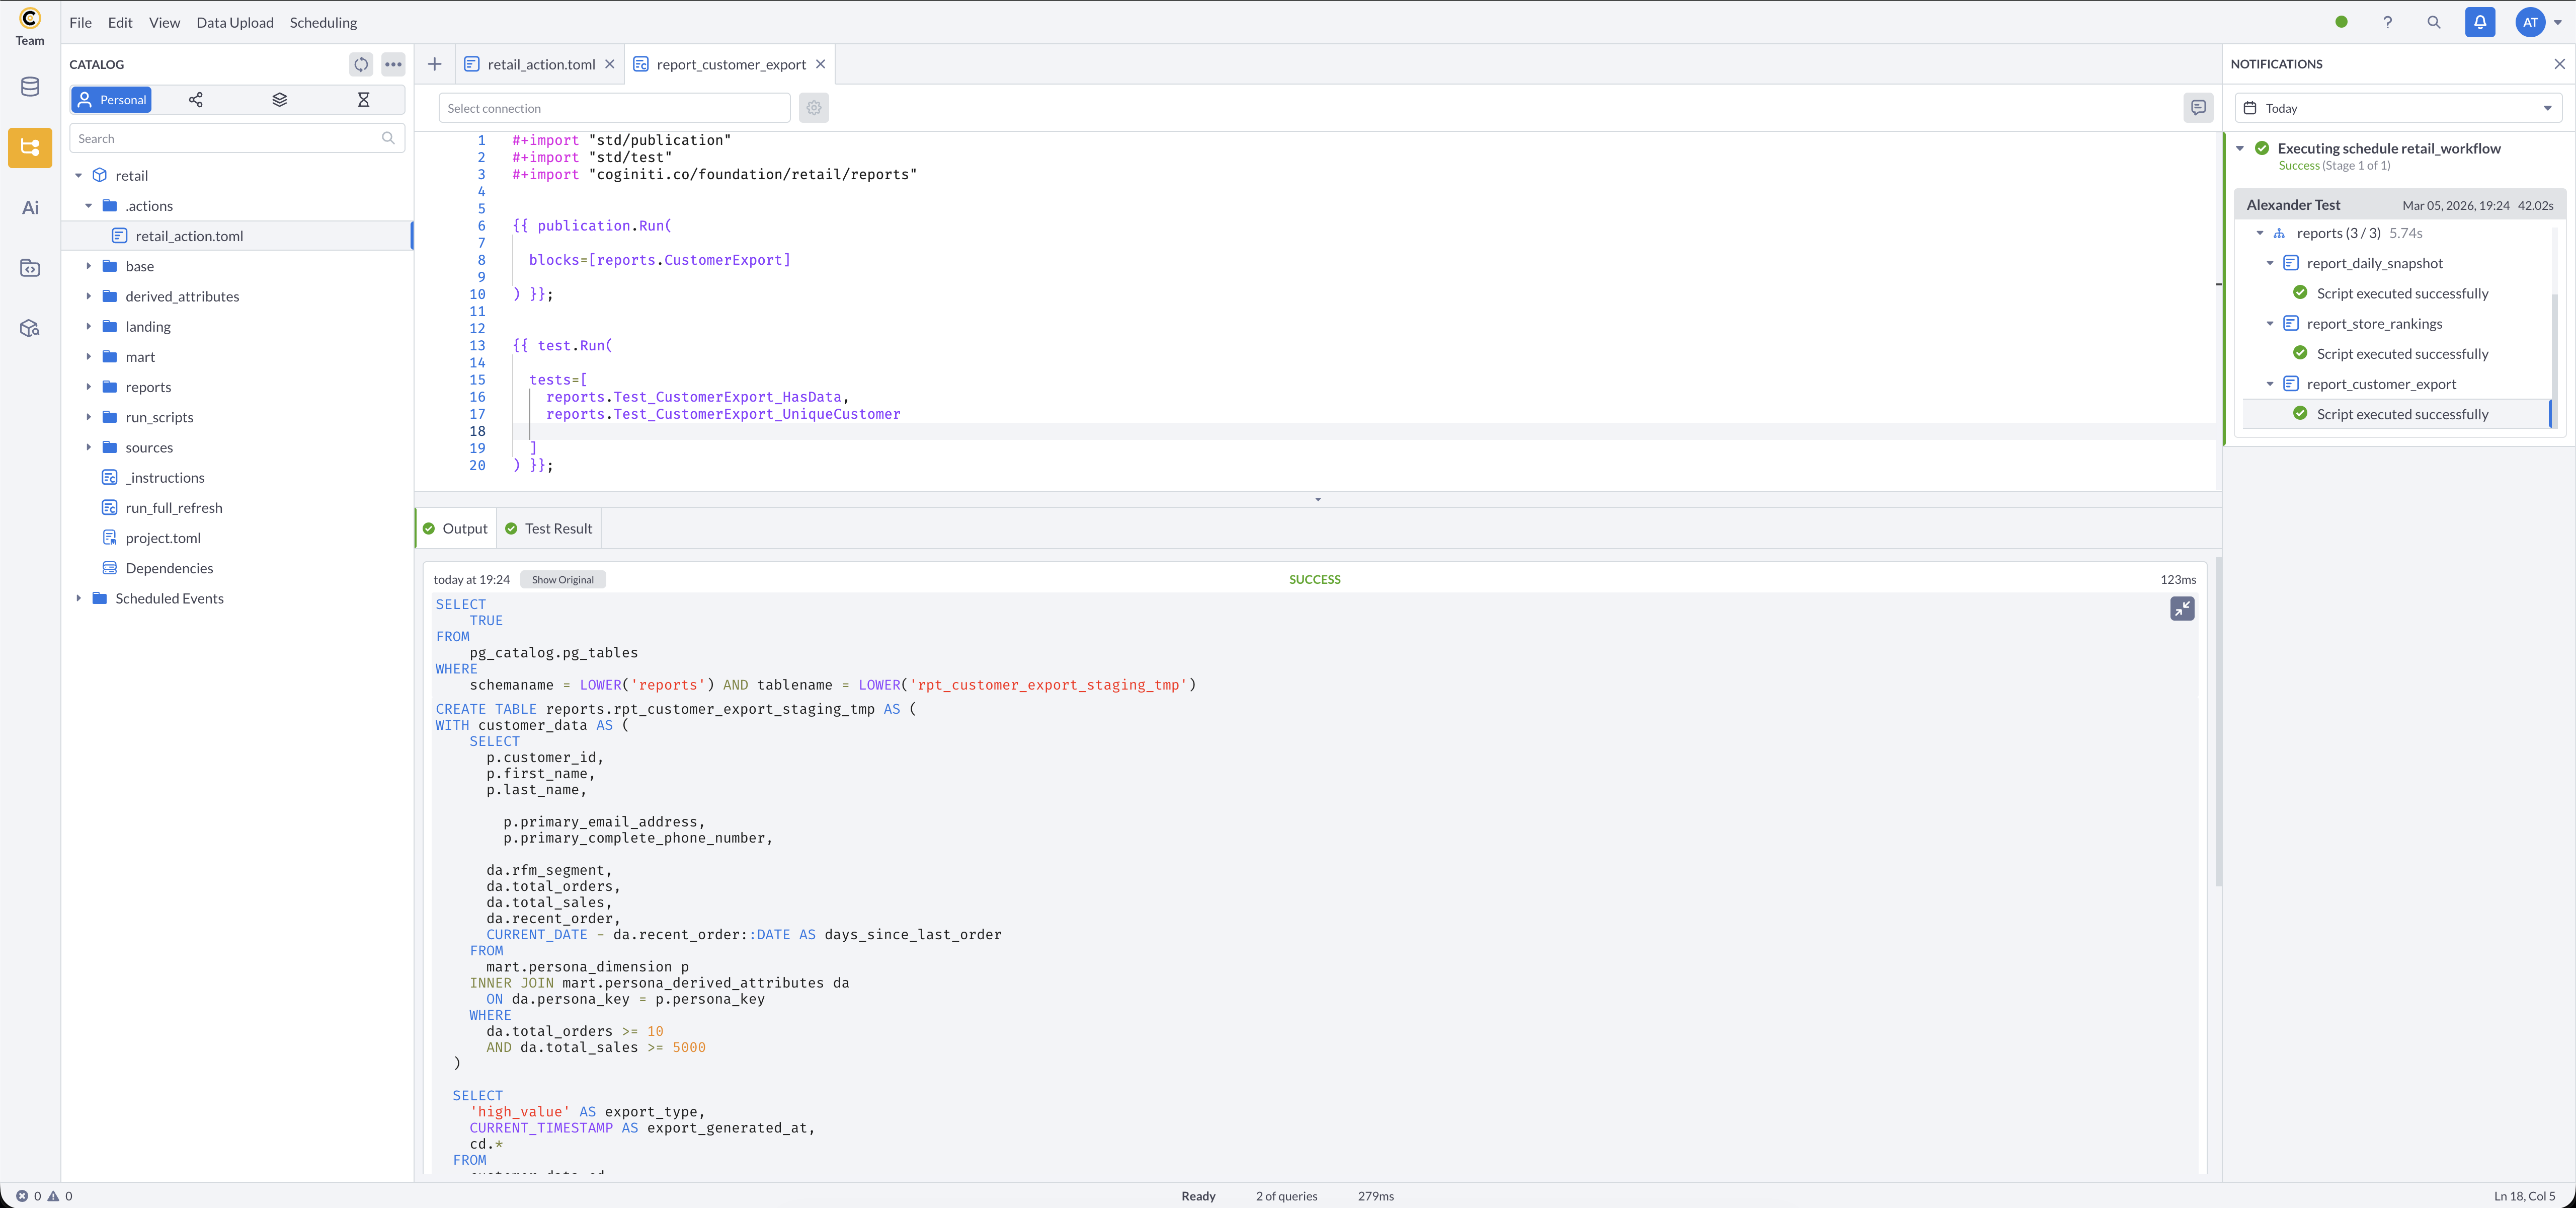
Reviewing the Customer Export Report
Report for flexible customer segmentation exports.
In the reports/ folder, open customer_export:
Key parameters:
$export_type— segment to export:all,high_value,at_risk,recent$min_orders— minimum order count filter (integer)$min_sales— minimum sales amount filter (integer)$include_contact_info— include email and phone in export:trueorfalse- Target table:
reports.rpt_customer_export_staging(overwrites on each run)
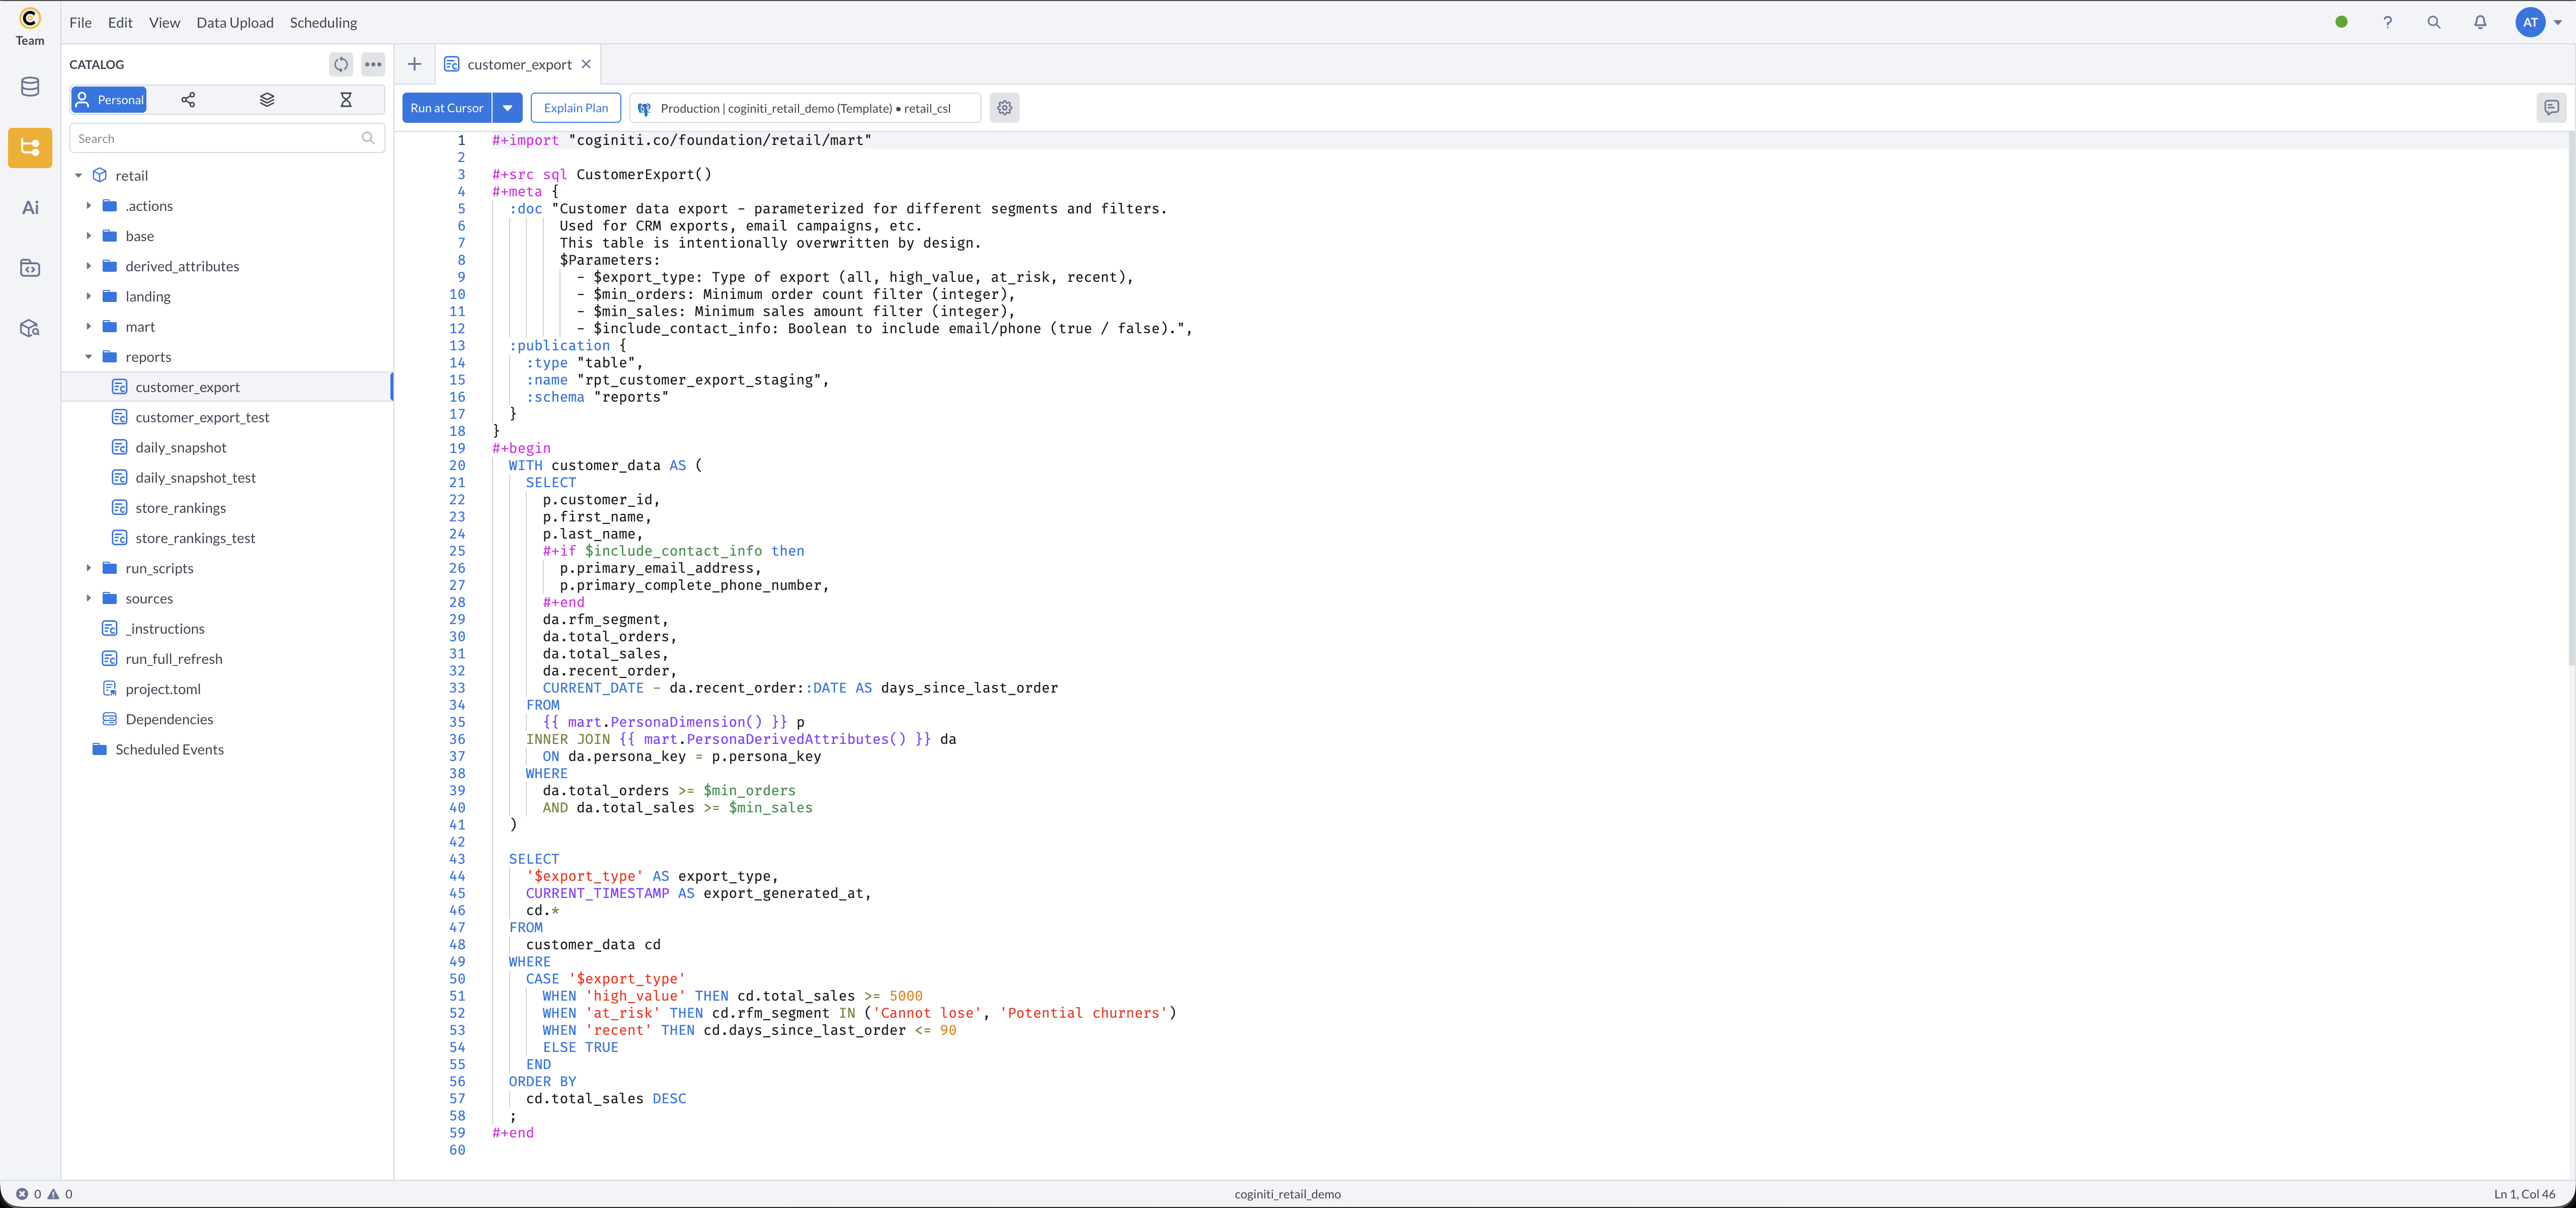
Reviewing the Report Run Script
- In
run_scripts/, open report_customer_export - What this does: runs the
CustomerExportentity specifically, then verifies the result has data and no duplicate customers.
Running Parameterized Reports Manually
- Run each report run script in sequence:
- Open report_daily_snapshot → run → provide parameter values in the pop-up
- Open report_store_rankings → run → provide parameter values in the pop-up
- Open report_customer_export → run → provide parameter values in the pop-up
- Verify tables were created in the
reportsschema
Step 3: Validating with Tests
Context: In this tutorial, data quality tests are integrated into the execution scripts and run automatically. However, depending on your use case, you may choose to create dedicated test scripts as well.
Tests in Coginiti return rows only when they fail, making it easy to spot issues.
More about tests: Tests — Coginiti Script Reference
Tests in-depth tutorial: Building Data Quality Tests with CoginitiScript
An action stops immediately upon any failure, tests included.
We are working on advanced error handling for future Coginiti releases — stay tuned!
How Tests Are Organized
Test definitions (#+test sql) live in _test files alongside the source entities they validate:
sources/customers_test,sources/stores_test,sources/products_test,sources/inbound_channels_testbase/touchpoint/email_address_test,base/touchpoint/email_domain_test,base/touchpoint/postal_address_test,base/touchpoint/postal_code_testbase/sales/sales_header_testreports/daily_snapshot_test,reports/store_rankings_test,reports/customer_export_test
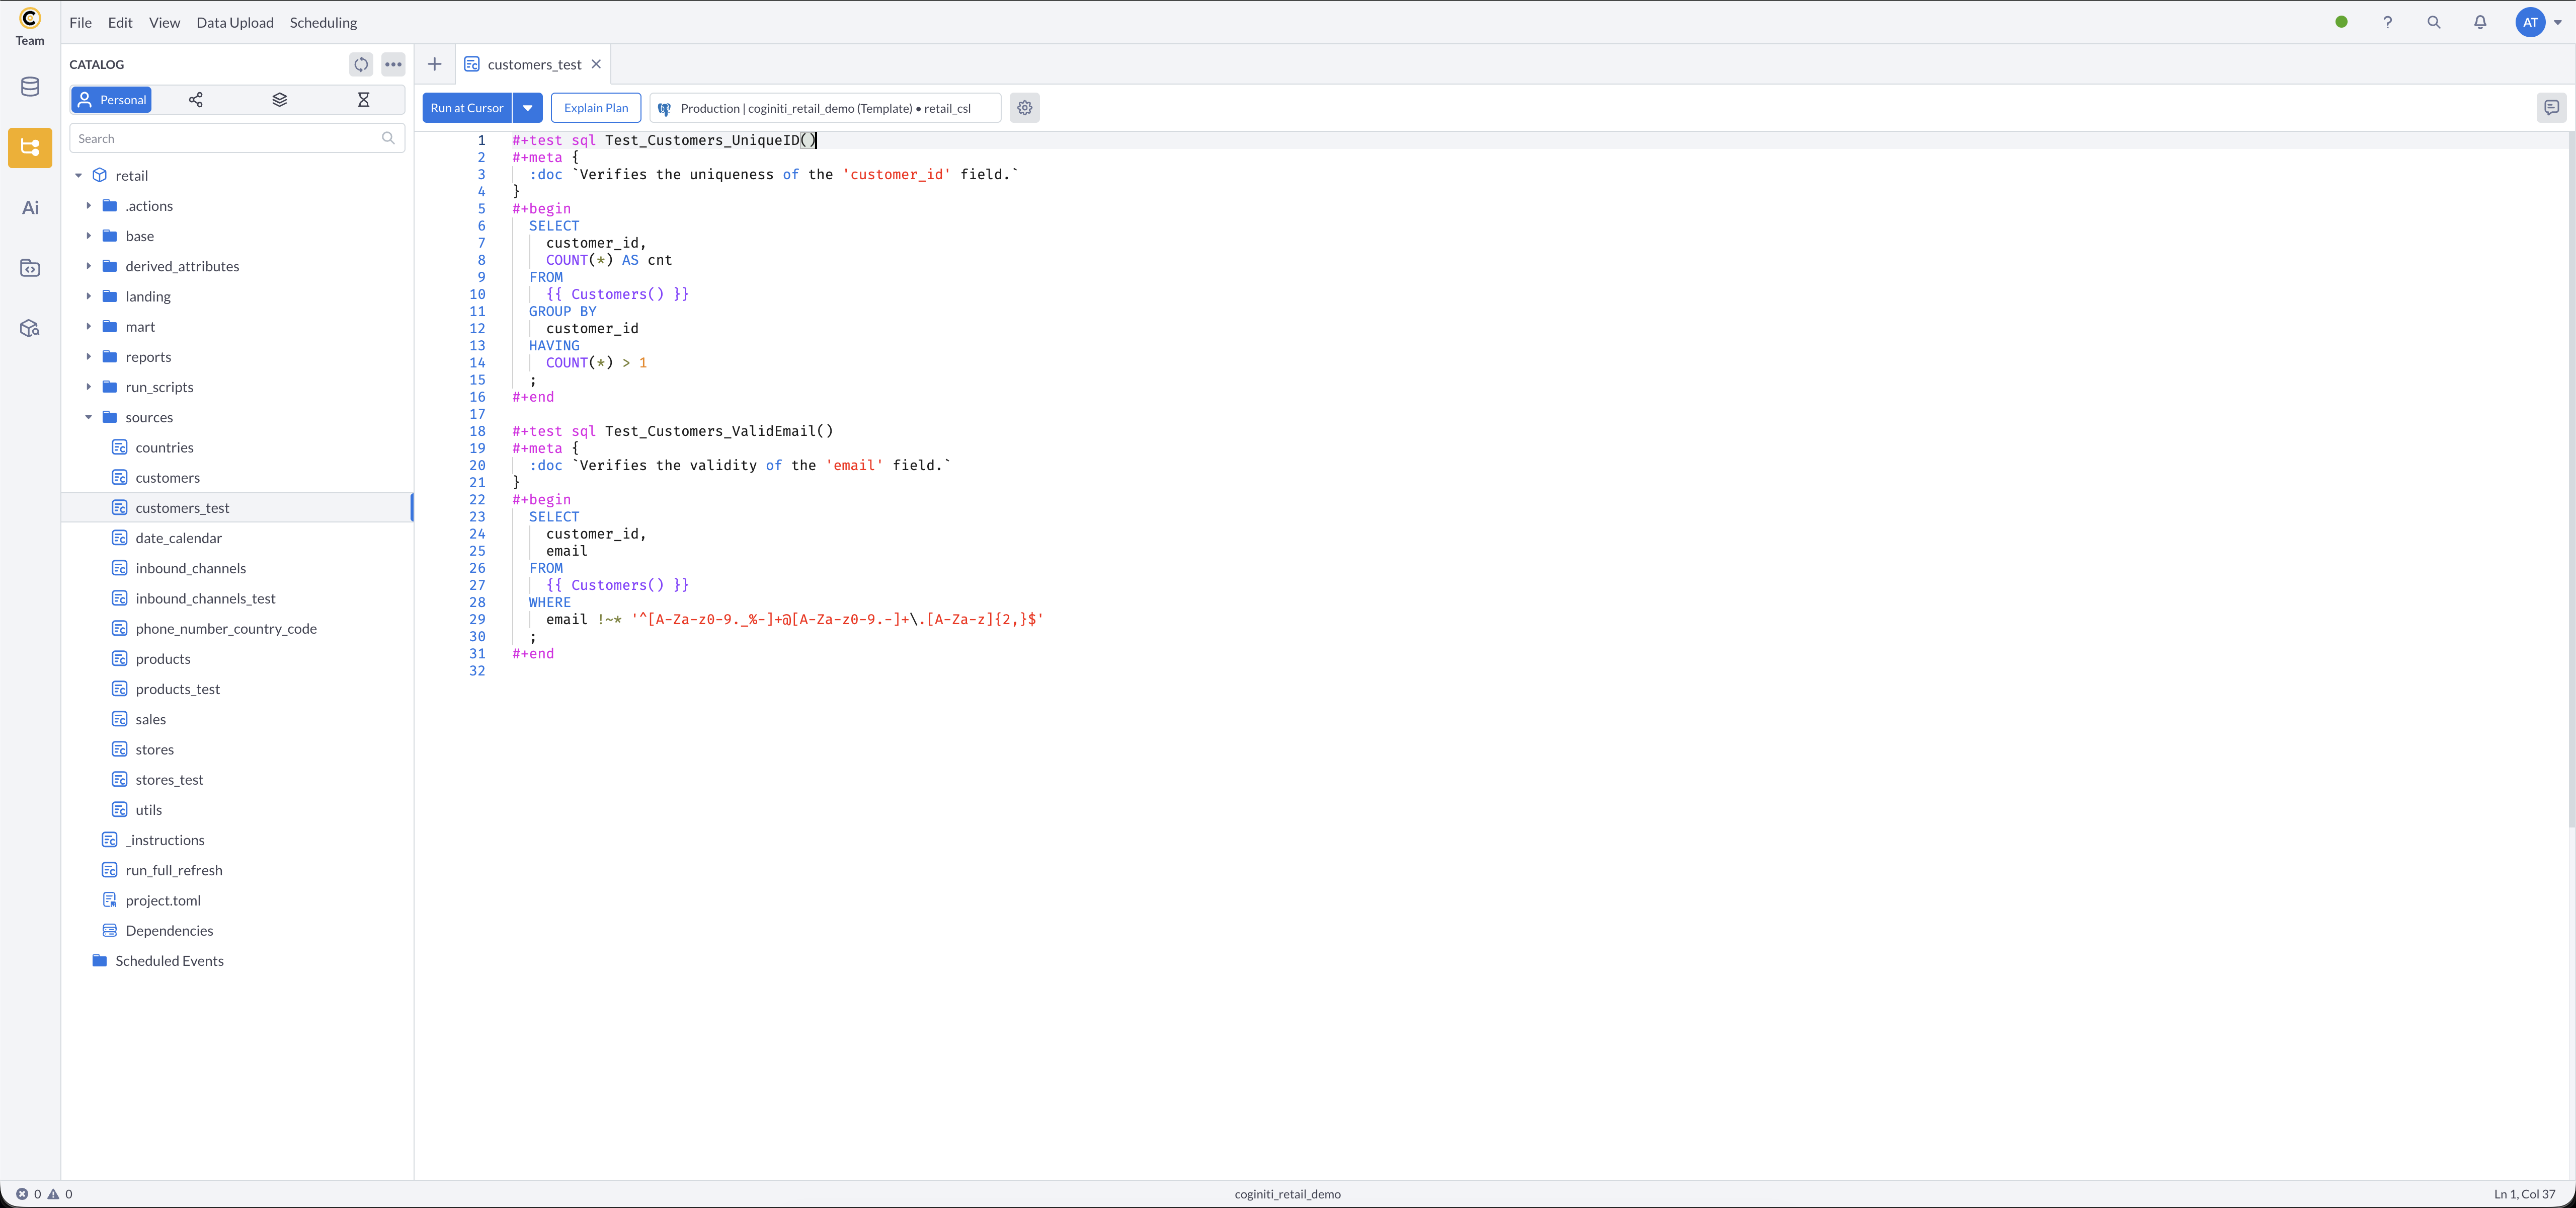
Reviewing Source Data Tests
- Navigate to the
sources/folder - Open customers_test
- What this checks:
Test_Customers_ValidEmail()— returns any customer IDs with invalid email format (should return no rows)
Test_Customers_UniqueID()— returns any customer IDs that appear more than once (should return no rows) - Other
_testassets follow the same pattern
How Tests Run in the Pipeline
Tests are not run manually — they execute automatically inside each run script:
- run_scripts/landing runs
test.Run(packages=[sources])— discovers and executes all#+test sqldefinitions in thesourcespackage - run_scripts/base runs
test.Run(packages=[location, touchpoint, customer, offering, datetime, sales])— discovers and executes all tests across base sub-packages - run_scripts/report_* each run
test.Run(tests=[...])— explicitly lists the specific tests for that report
Reviewing Targeted Report Tests
Report run scripts list their tests explicitly rather than discovering an entire package:
- Review report_daily_snapshot in
run_scripts/ - What's different:
tests=[reports.Test_DailySnapshot_HasData, reports.Test_DailySnapshot_NoNullDates]explicitly names which tests to run, giving precise control over report validation.
Report tests for store_rankings and customer_export follow the same pattern.
Interpreting Test Results
When you run any run script, test results appear in the output:
- No rows returned — all tests passed ✅
- Rows returned — tests failed ❌ (the rows show the failing records)

Best Practices
- Use descriptive test names that reflect what is being validated, ending with the
_testsuffix - Check business rules: test for nulls, duplicates, and referential integrity
- Use
#+meta { :doc }to explain what each test validates
Step 4: Reviewing the Orchestration Action
Context: Now that all run scripts are understood, the team orchestrates them into an automated workflow with job dependencies and a schedule.
For a step-by-step guide to creating actions: Creating Coginiti Actions
For field reference: Coginiti Actions Reference
Reviewing the Action File
- In the project, navigate to the
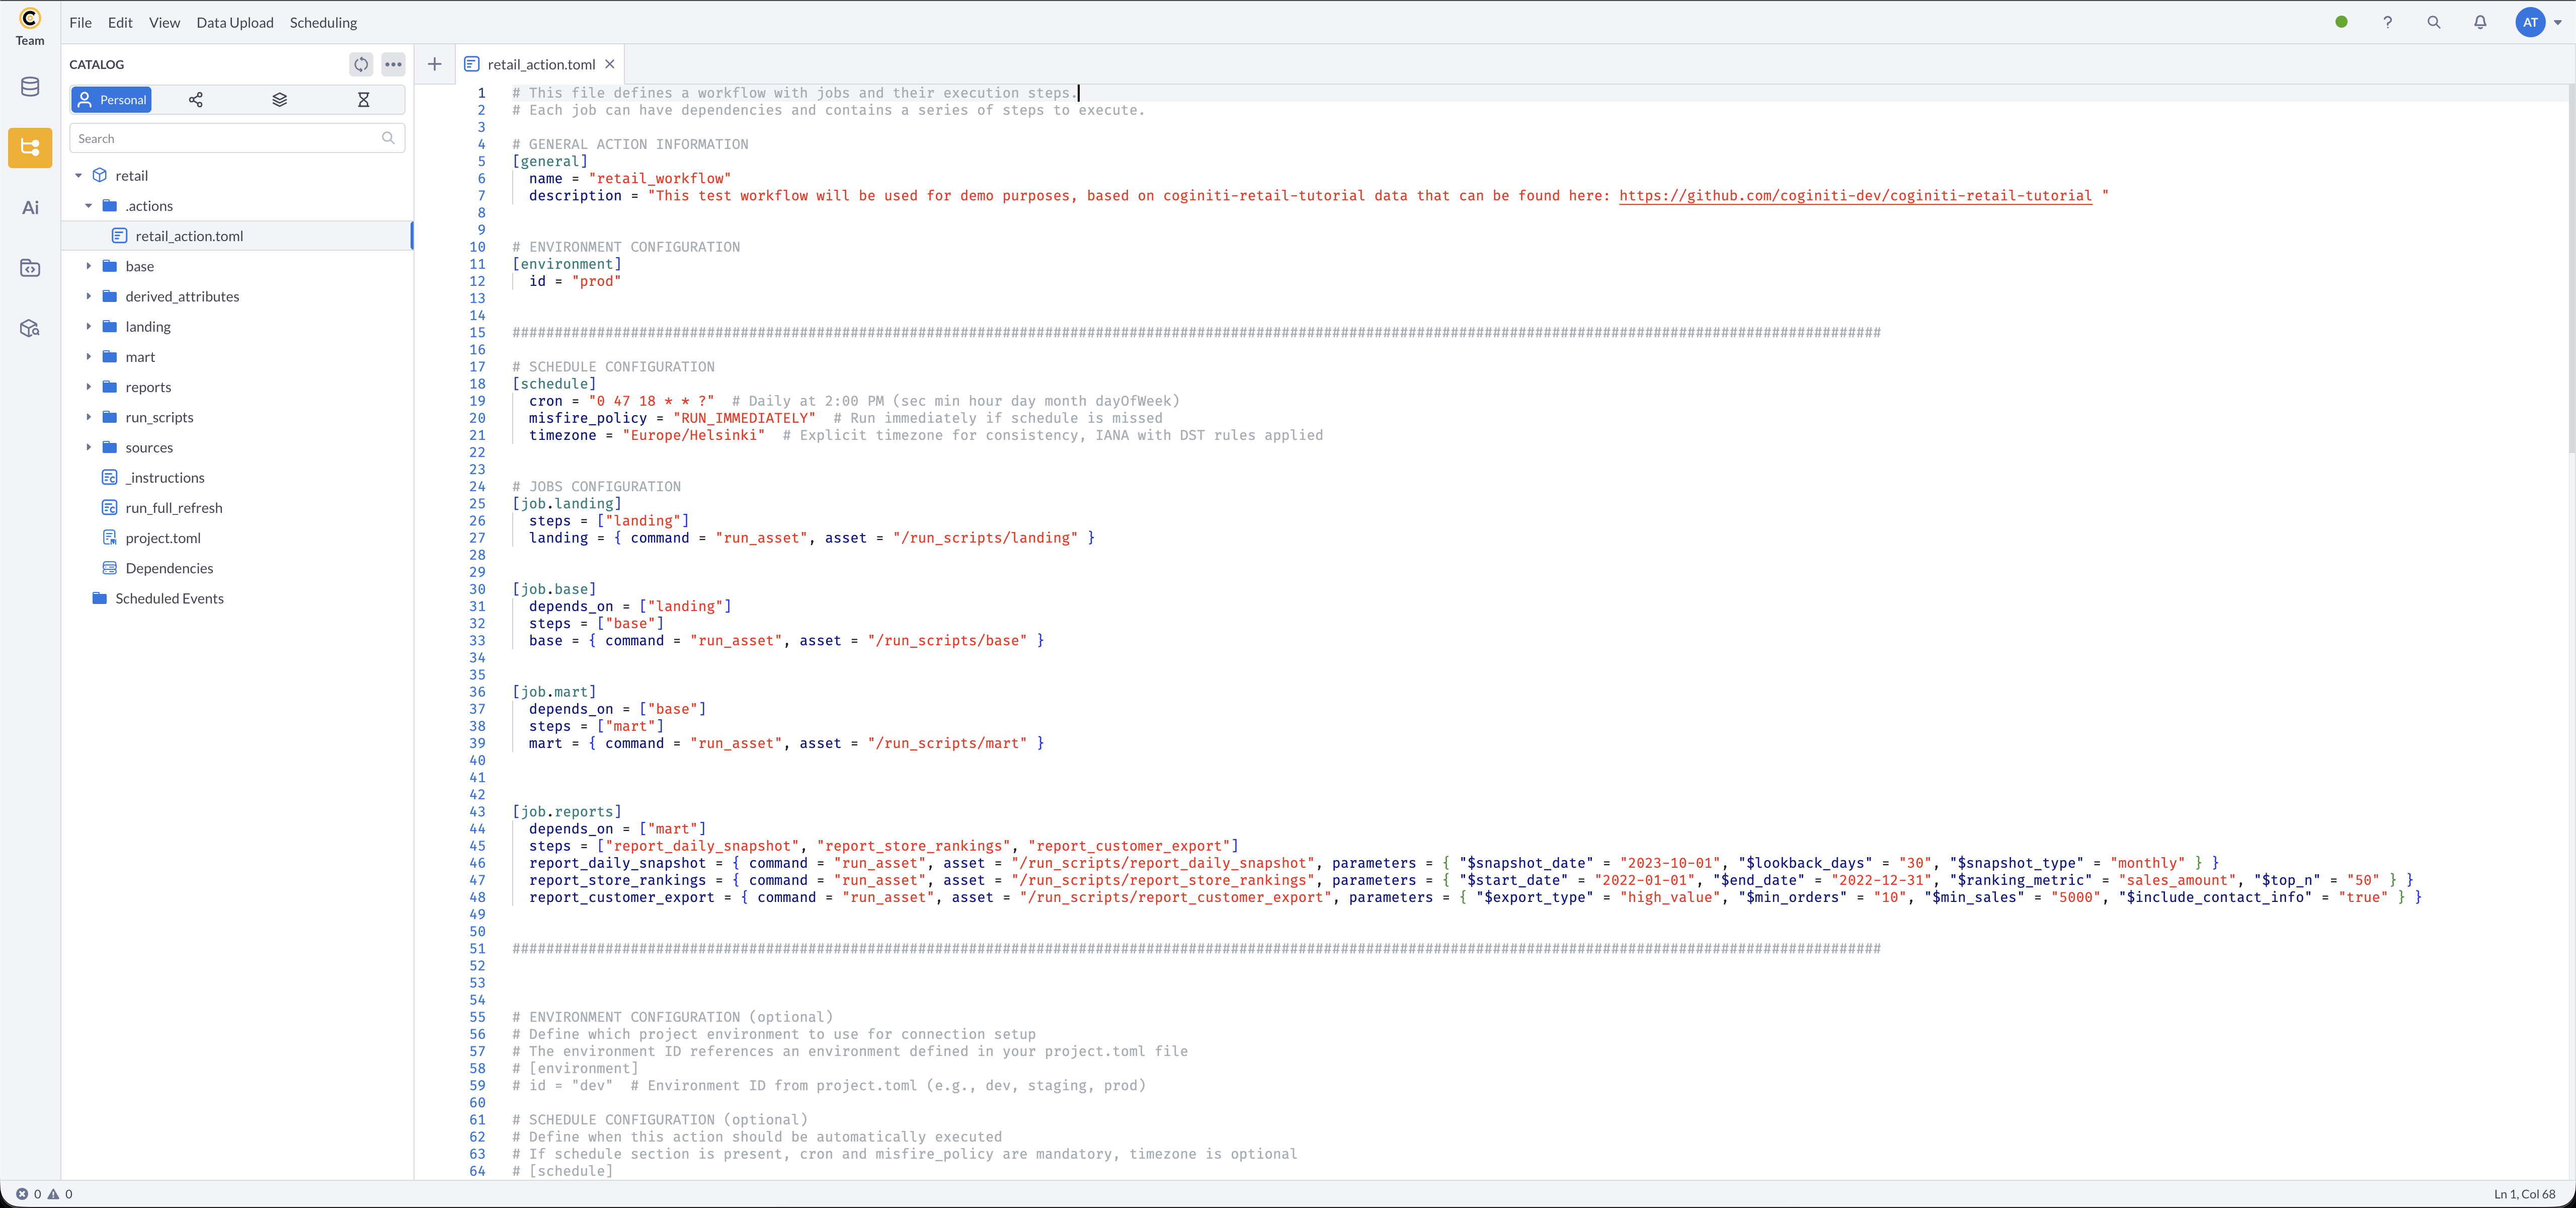
.actions/folder - Open retail_action.toml
- The file is organized into these sections:
[general] — Required. name and description of the action.
[environment] — Optional. Specifies which project environment to use for connection setup. The id must match an environment defined in project.toml.
More about environments: Coginiti Environments
[schedule] — Optional. Scheduling configuration. When present, cron and misfire_policy are required; timezone is optional but recommended.
If a non-IANA timezone is used, you will see a DST notification in the Scheduler:

[job.<job_name>] — Required. A job groups steps that execute together.
depends_on = [...] — Optional. Lists jobs that must complete before this job starts.
steps = [...] — Required. Step names executed in the listed order.
<step_name> = { command, asset } — Required. Step definition with run_asset command and asset path.
parameters = { ... } — Optional. Key-value pairs passed to the asset. If defined here, they override any external parameters from scheduled events.
The Complete Action File
ETL Pipeline Jobs
[general]
    name = "retail_workflow"
    description = "This test workflow will be used for demo purposes, based on coginiti-retail-tutorial data that can be found here: https://github.com/coginiti-dev/coginiti-retail-tutorial"

[environment]
    id = "prod"

[schedule]
    cron = "0 15 20 * * ?"        # sec min hour day month dayOfWeek — runs at 20:15 daily
    misfire_policy = "RUN_IMMEDIATELY"
    timezone = "Europe/Helsinki"  # IANA timezone with DST rules applied

[job.landing]
    steps = ["landing"]
    landing = { command = "run_asset", asset = "/run_scripts/landing" }

[job.base]
    depends_on = ["landing"]
    steps = ["base"]
    base = { command = "run_asset", asset = "/run_scripts/base" }

[job.mart]
    depends_on = ["base"]
    steps = ["mart"]
    mart = { command = "run_asset", asset = "/run_scripts/mart" }
This creates the pipeline: landing (with source tests) → base (with base tests) → mart
Report Jobs
[job.reports]
    depends_on = ["mart"]
    steps = ["report_daily_snapshot", "report_store_rankings", "report_customer_export"]
    report_daily_snapshot = { command = "run_asset", asset = "/run_scripts/report_daily_snapshot", parameters = { "$snapshot_date" = "2023-10-01", "$lookback_days" = "30", "$snapshot_type" = "monthly" } }
    report_store_rankings = { command = "run_asset", asset = "/run_scripts/report_store_rankings", parameters = { "$start_date" = "2022-01-01", "$end_date" = "2022-12-31", "$ranking_metric" = "sales_amount", "$top_n" = "50" } }
    report_customer_export = { command = "run_asset", asset = "/run_scripts/report_customer_export", parameters = { "$export_type" = "high_value", "$min_orders" = "10", "$min_sales" = "5000", "$include_contact_info" = "true" } }
This creates three reports sequentially after mart is ready, each with its own parameters.
Resulting dependency chain:
landing → base → mart → reports
                         ├── report_daily_snapshot  ($snapshot_date, $lookback_days, $snapshot_type)
                         ├── report_store_rankings  ($start_date, $end_date, $ranking_metric, $top_n)
                         └── report_customer_export ($export_type, $min_orders, $min_sales, $include_contact_info)
The bottom of the file contains an annotated template showing every supported field — the same template appears in every newly created action file:
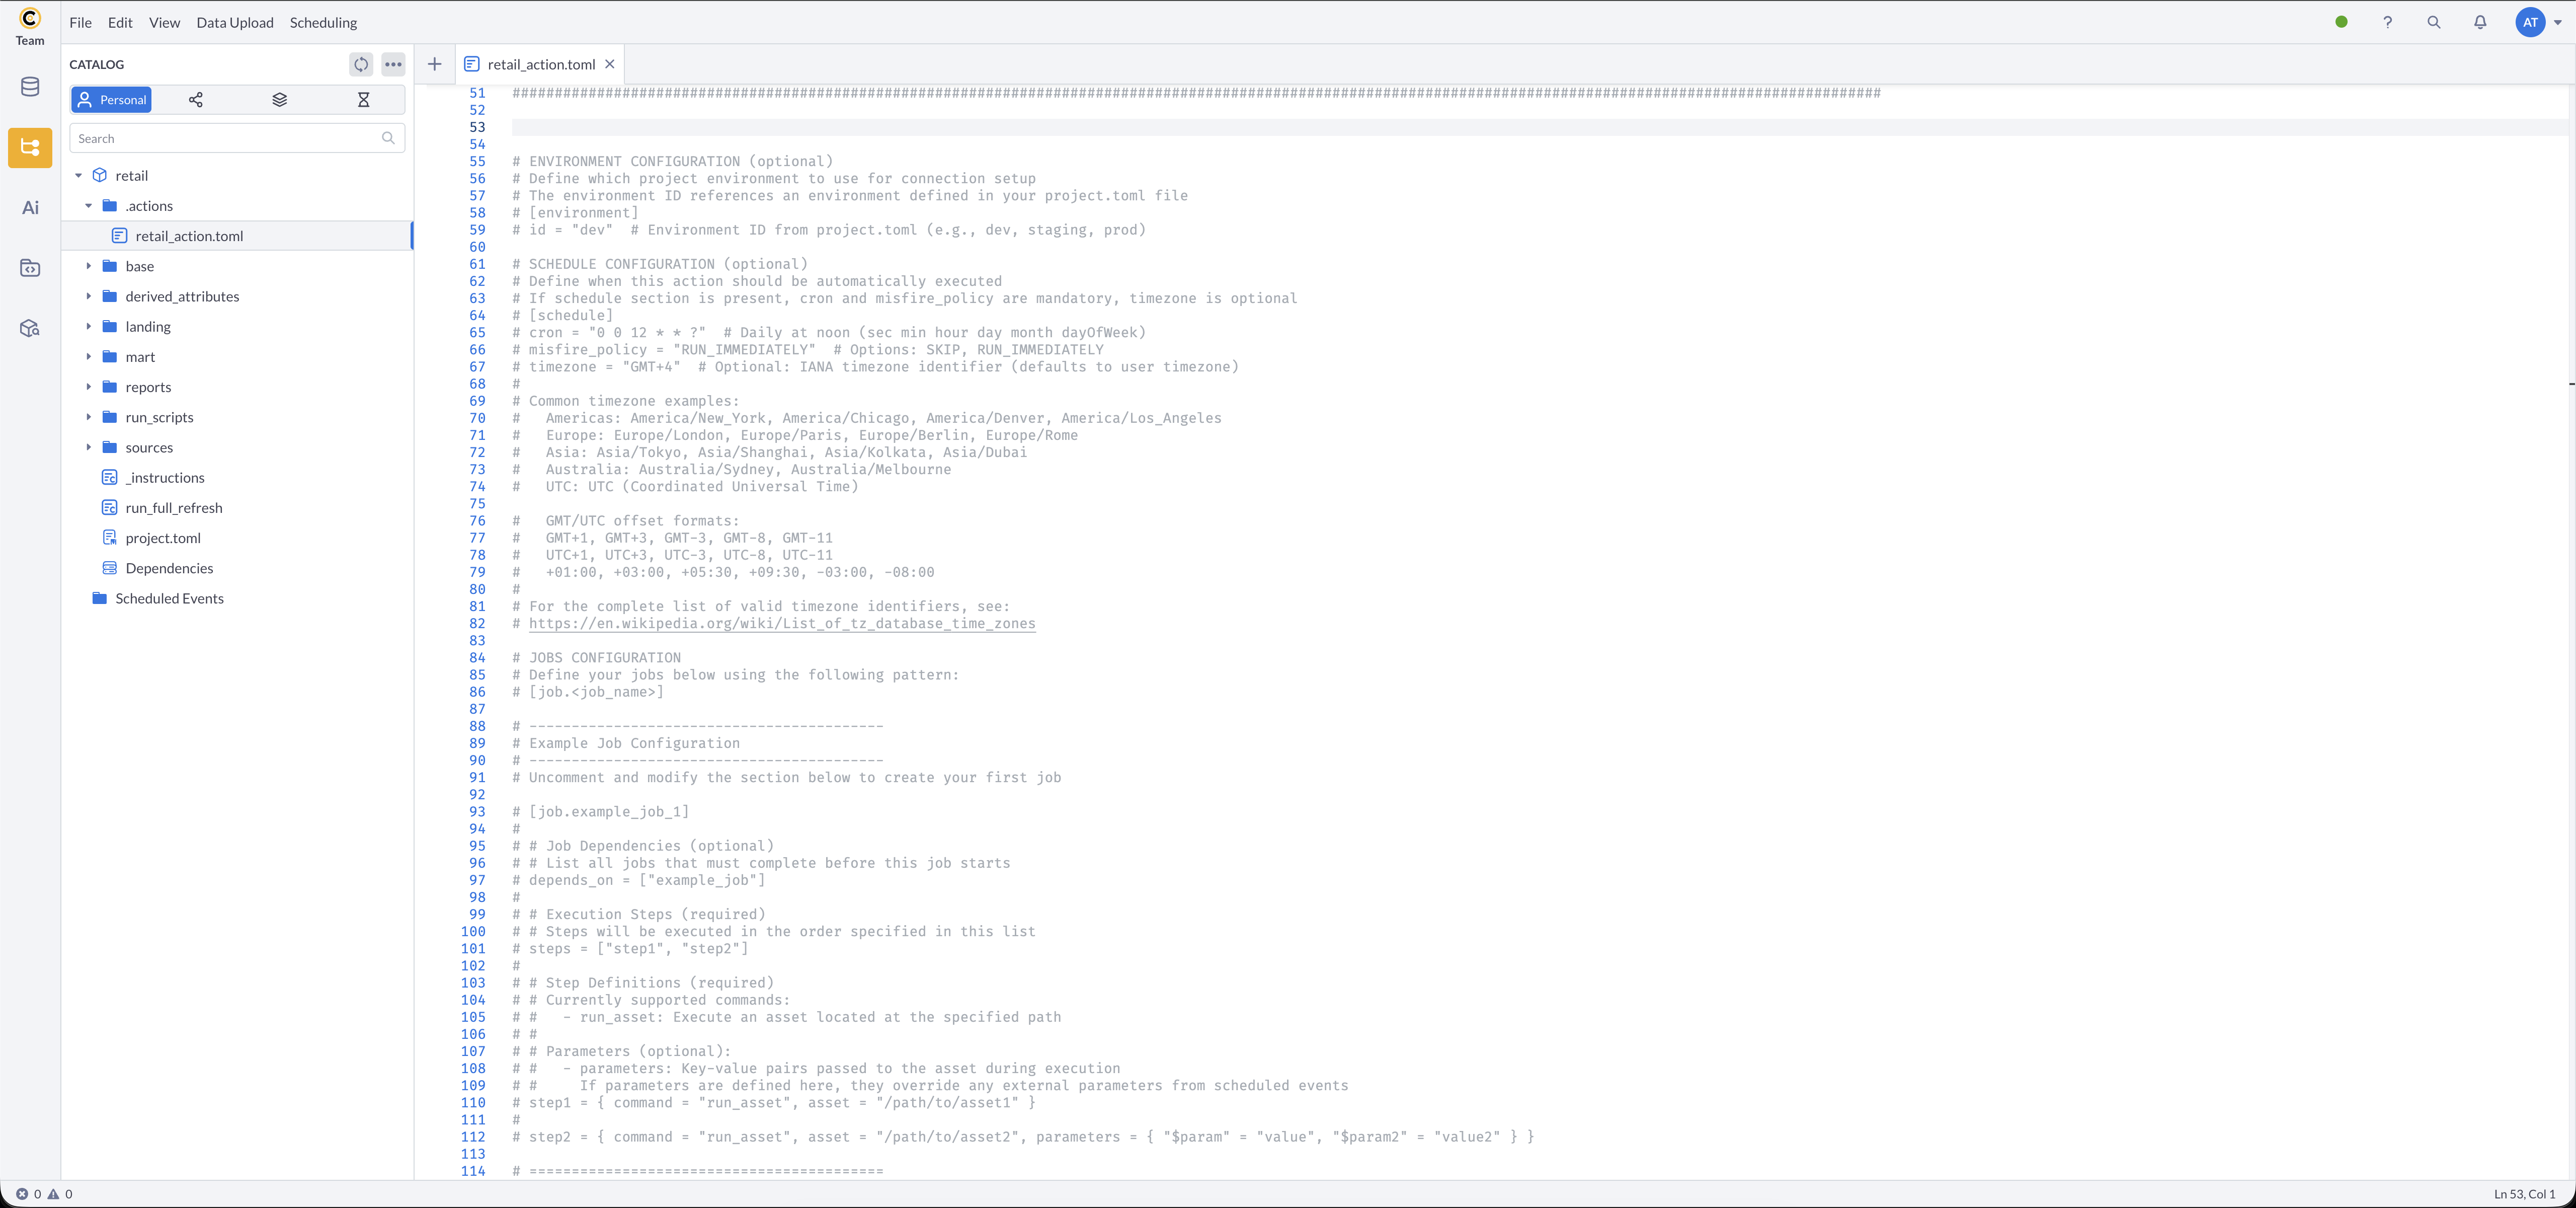
All parameter values must be strings in TOML (use quotes):
✅ parameters = { "$start_date" = "2022-01-01", "$top_n" = "50", "$include_contact_info" = "true" } — correct
❌ parameters = { "$start_date" = 2022-01-01, "$top_n" = 50, "$include_contact_info" = true } — unquoted values will error
Asset paths must start with a leading slash:
✅ asset = "/run_scripts/report_daily_snapshot" — correct
❌ asset = "run_scripts/report_daily_snapshot" — missing leading slash will error
Step 5: Scheduling and Automation
To execute the entire pipeline on a schedule:
- Update the
[schedule]block in retail_action.toml to meet your needs and save the changes - Go to Scheduling → Manage Scheduled Events
- Click Add
- Name — choose a name for this scheduled event
- Scheduled Object — select retail_action.toml from the retail project
- Connection, Database, Schema — filled automatically from the
[environment]field.
If not configured: choose your Connection → Database =retail_csl - Configure If Schedule Missed and Notifications as needed
- Parameters — enable Parse Parameters and select the
$<name>option. Parameters are loaded automatically from the action file. - Click Save, then Start
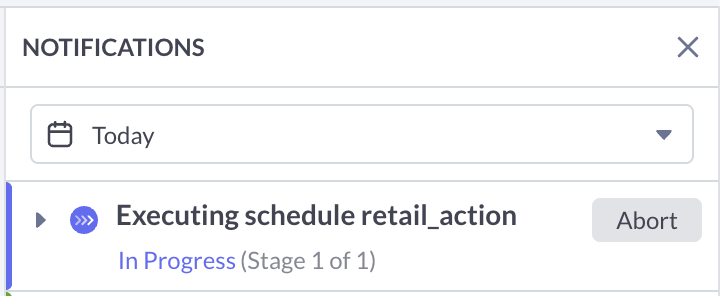
The scheduled action starts at the configured time and sends a notification:
The notification updates to reflect success or failure:
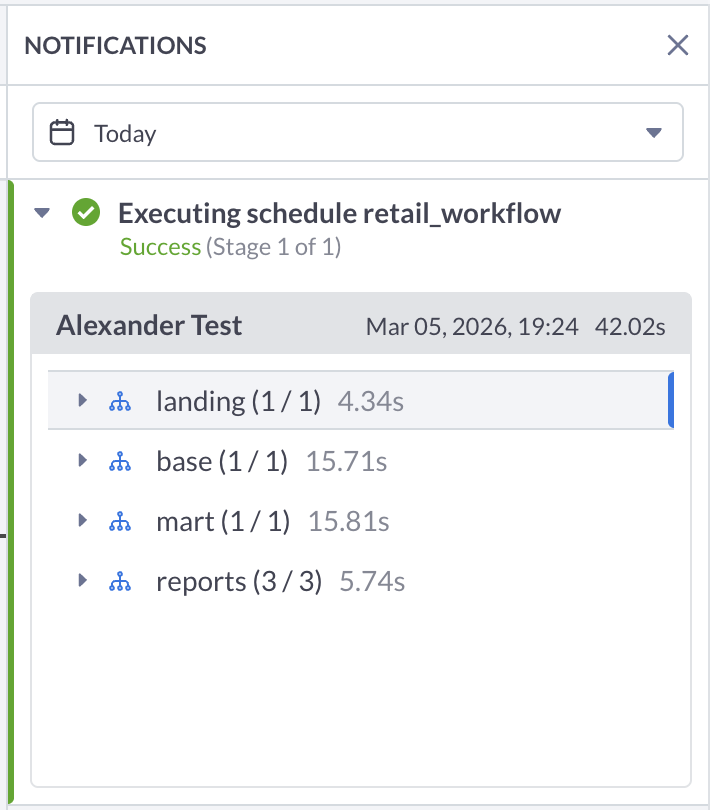
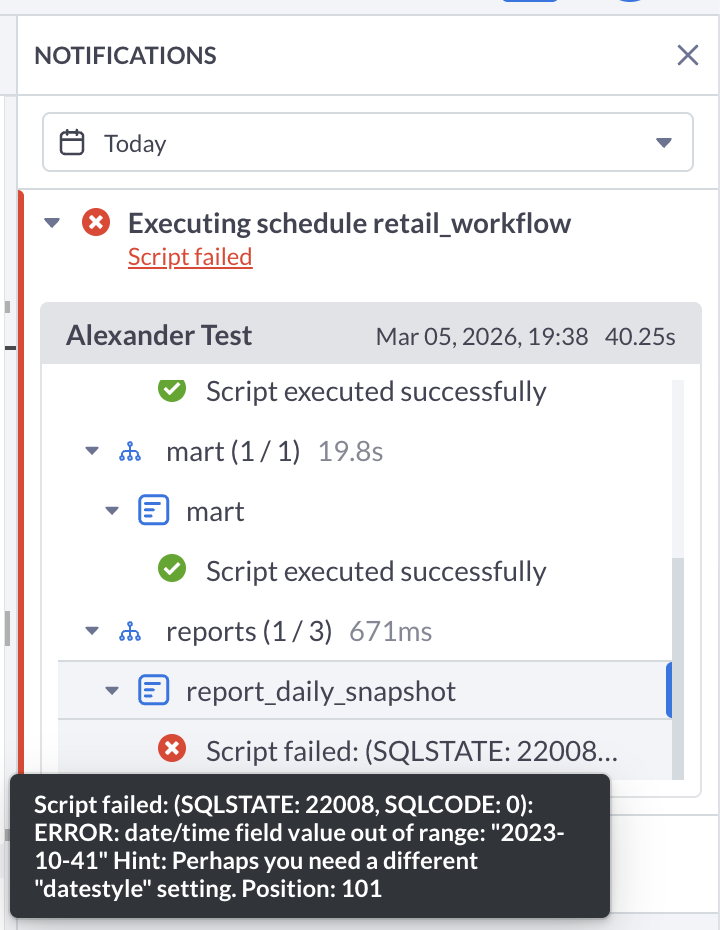
You can open each step to inspect its result:
For more information about other exciting Coginiti features visit our documentation