How to Share a Project with Semantic Layer
This guide explains how administrators can share a Coginiti project that includes a configured semantic layer with other users or groups, so they can query it using the semantic SQL dialect or connect via JDBC from external BI tools.
Semantic layer concepts: Semantic Layer Overview
Semantic model reference: Semantic Model Reference
Semantic SQL reference: Semantic SQL Reference
Prerequisites
- Administrator access to Coginiti Team
- PostgreSQL database named
retail_cslwith schemas created:landing,stage,base,mart,reports - A project with a configured semantic layer available in your Personal catalog
You may use the coginiti-retail-tutorial project as a ready-made example.
Available here: https://github.com/coginiti-dev/coginiti-retail-tutorial
For a complete walkthrough see: Coginiti Retail Project Complete Workflow Tutorial
The project must have a [semantic] section configured in its project.toml, for example:
[general]
name = 'coginiti.co/foundation/retail'
description = 'Retail Foundation implements data transformation for base and mart layers of the retail model.'
version = '1.0.0'


[environment]
default = "prod"

[environment.prod]
name = "Production"
connection = { name="coginiti_retail_demo", overrides={ database="retail_csl" } }

[environment.semantic]
name = "Semantic"
connection = { name="coginiti_retail_demo", overrides={ database="retail_csl", schema="mart" } }


# Semantic Layer Project Configuration
# Defines named semantic model sets that map to entity definition paths.

[semantic]
default = "all"

# Full retail analytics model — all domains combined
[semantic.all]
name        = "Retail Analytics"
path        = "semantic"
environment = "semantic"

# Sales domain only — fact + time + channel
[semantic.sales]
name        = "Sales Domain"
path        = "semantic/sales"
environment = "semantic"

# Customer domain only — persona + RFM segmentation
[semantic.customers]
name        = "Customer Domain"
path        = "semantic/customer"
environment = "semantic"
Step 1: Publish the project to Project Hub
Before sharing, the project must be published to the Project Hub so that other users can access it.
Option A: Publish via project review (recommended)
- In your catalog, right-click the project folder and select Request Review
- Fill in the review details, assign a reviewer and a publisher, and click Create
- Once the reviewer approves, the publisher publishes the project to Project Hub
For the full project review and publishing workflow see: Create your first Project Review
Option B: Publish directly (skip review)
If you have publish permissions and want to skip the review process:
- In your catalog, right-click the project folder and select Publish
- Choose the target location in Project Hub
- Click Publish to confirm
After publishing, the project appears in Project Hub at the path you specified during publication (for example, Project Hub > Demos > retail).
Step 2: Share the published project with users or groups
Grant the target users or groups access to the published project in Project Hub.
- Navigate to Project Hub and locate folder with your published project
- Right-click the folder and select Share
- Add the users or groups who need access
- Set the appropriate permission level (at minimum View access is required to use the semantic layer)
- Save the changes
For details on Project Hub permissions and organization: Structuring Your Project Hub
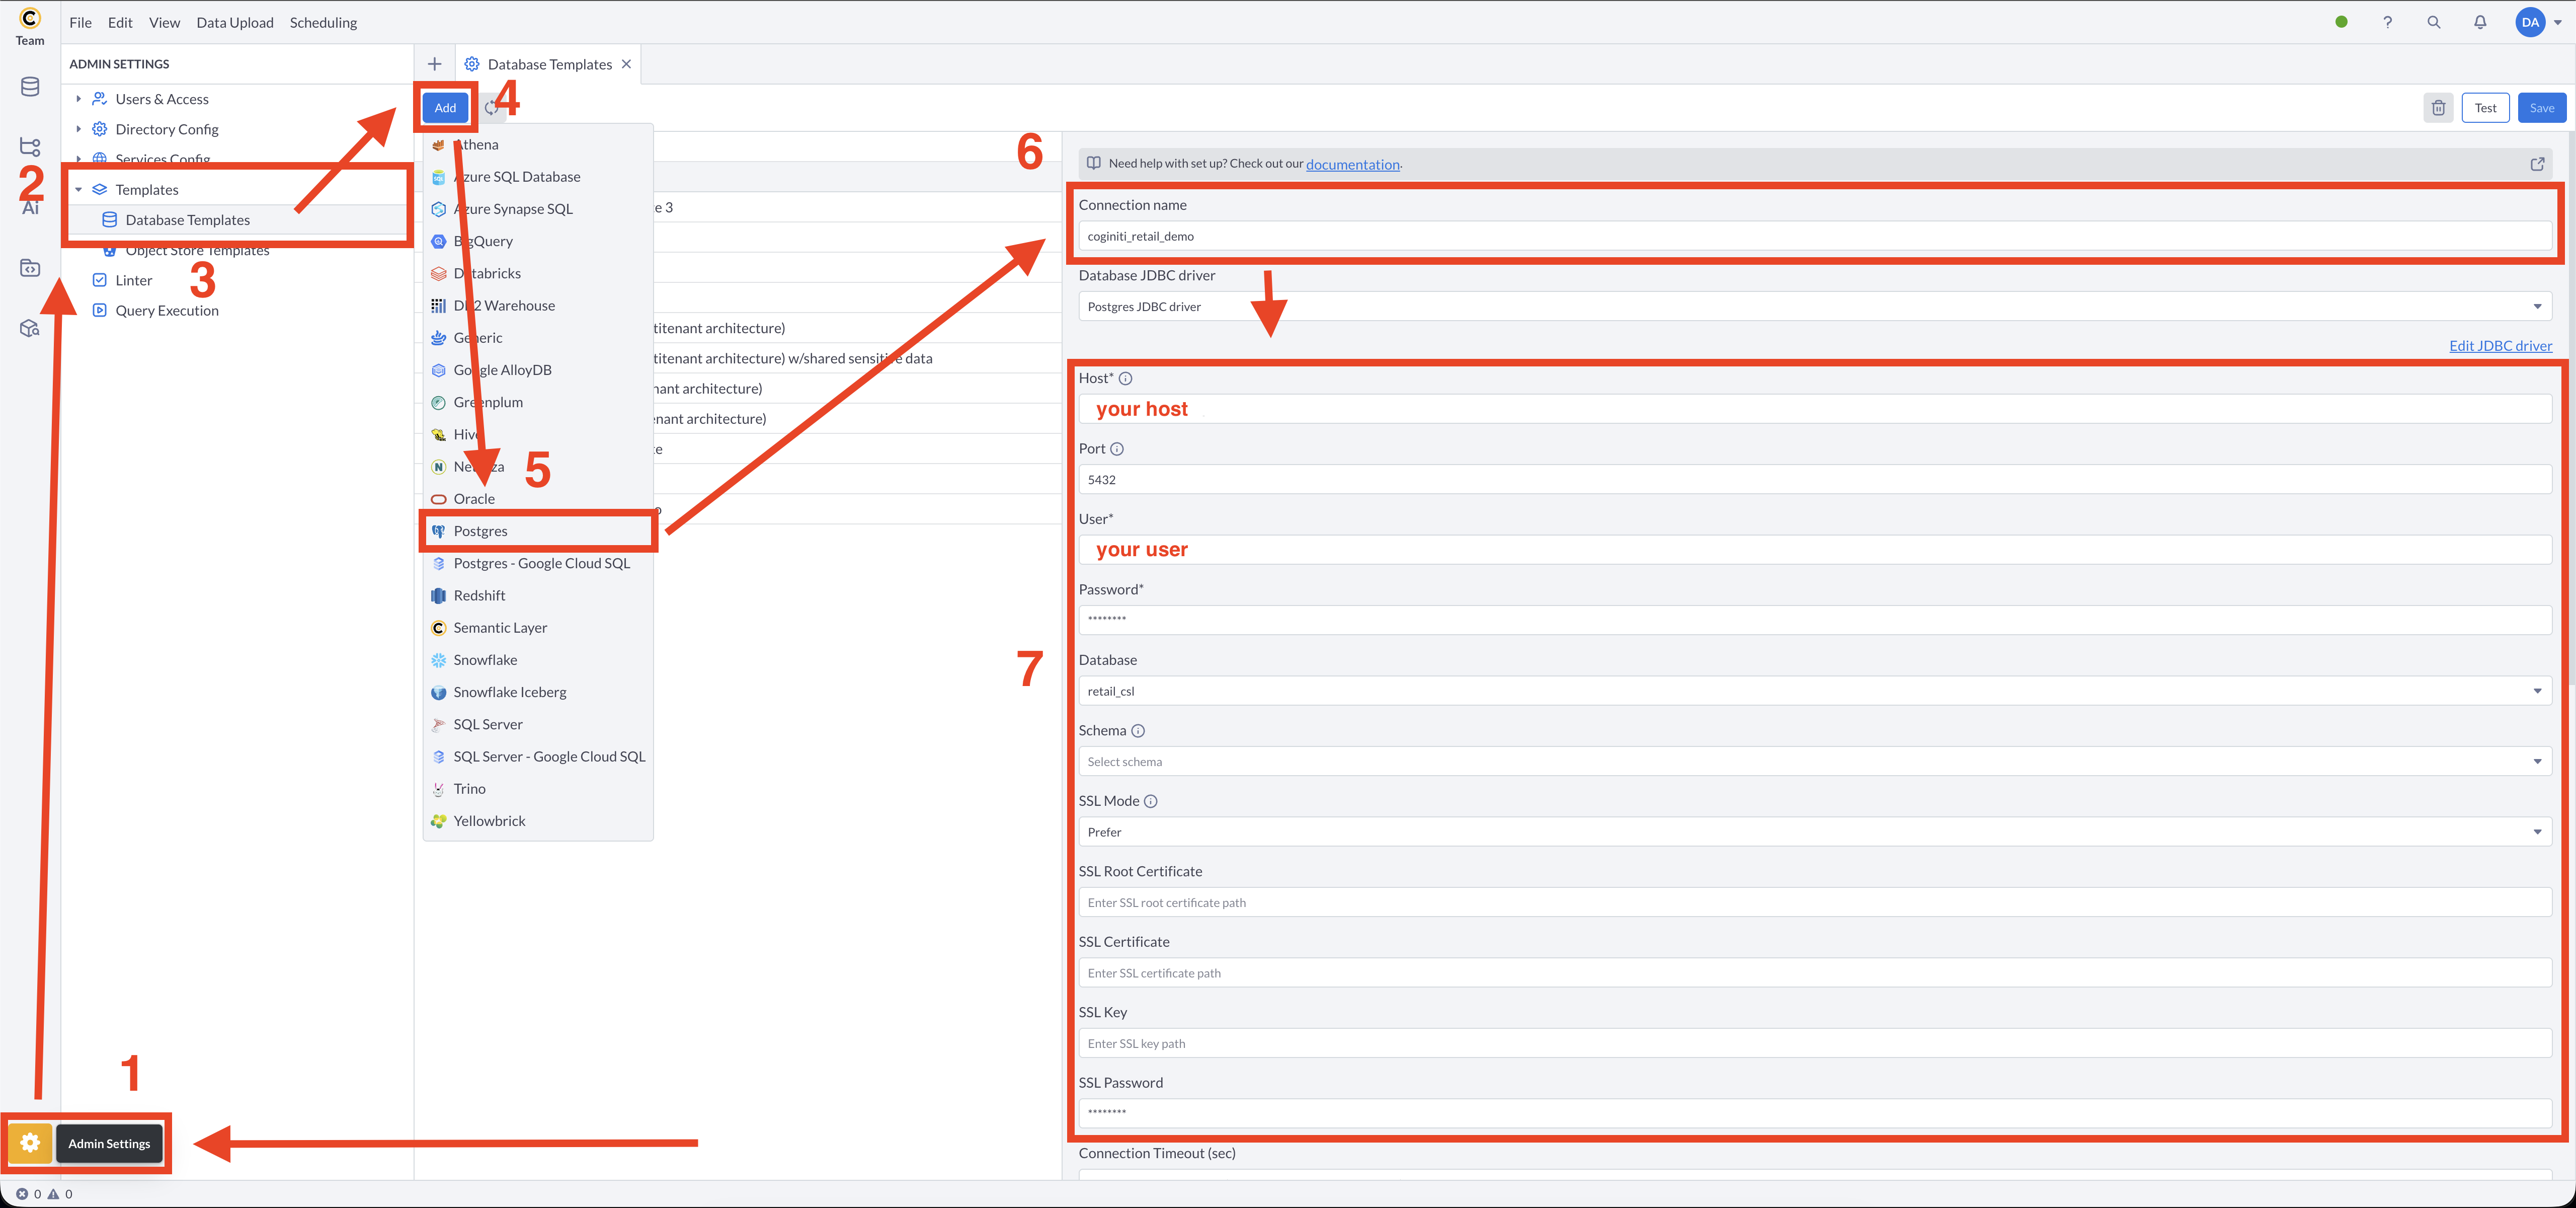
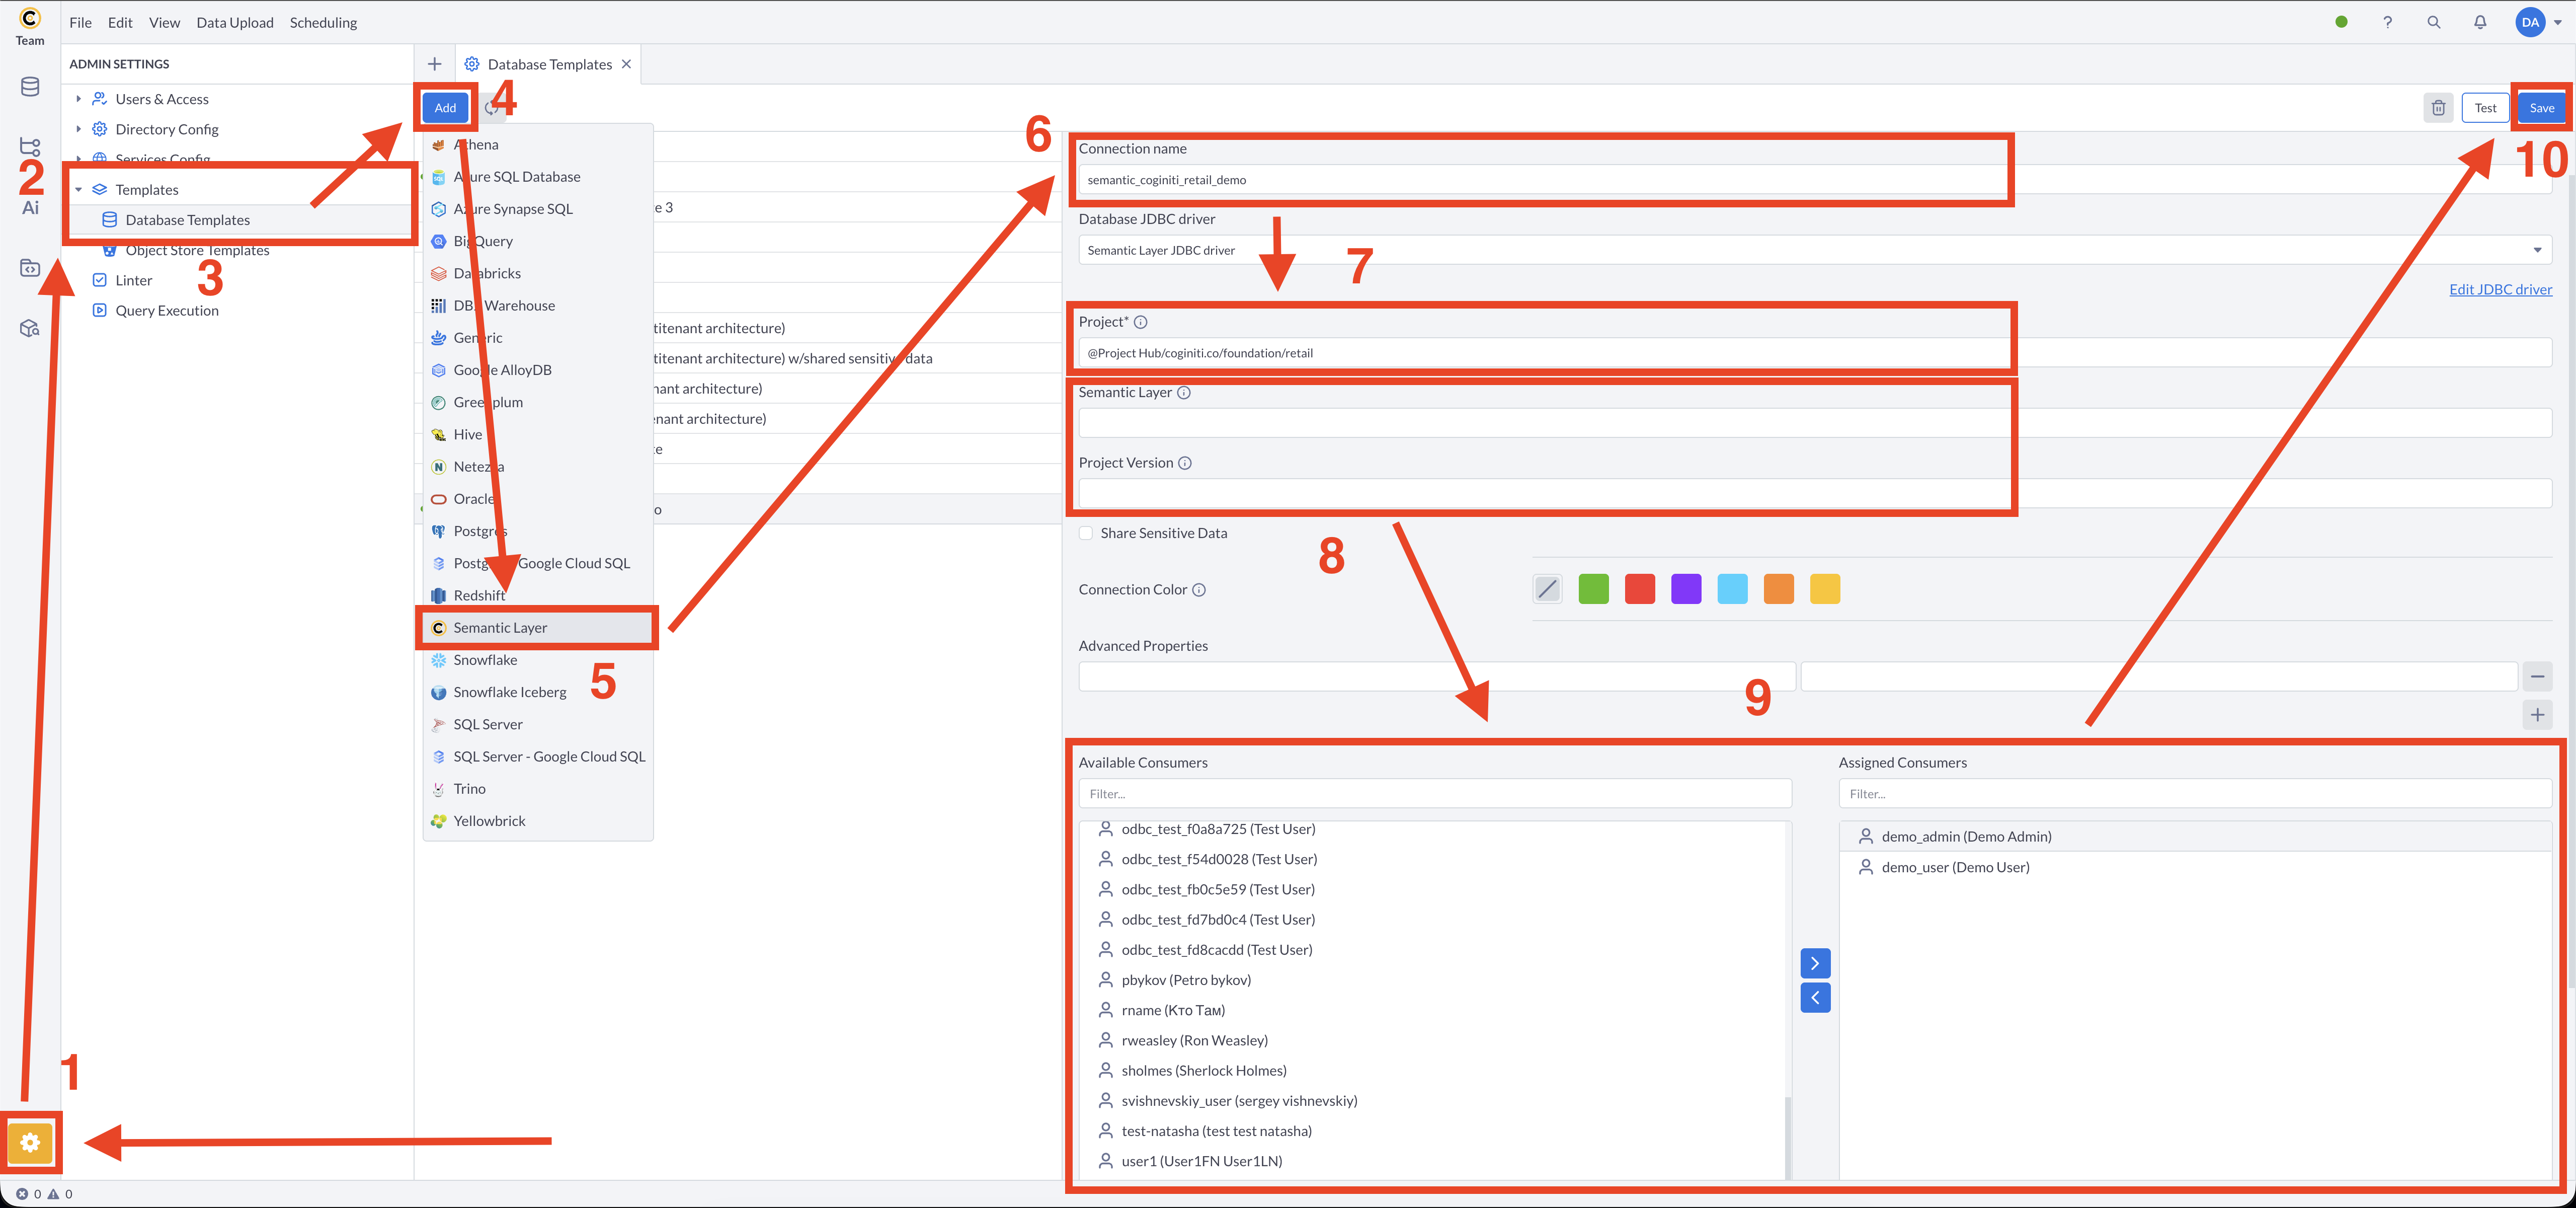
Step 3: Add a database connection template
Users need a database connection to execute semantic queries. Create a connection template that matches the connection name defined in the project's project.toml.
The connection template name must exactly match the connection name specified in the [environment] block of the project's project.toml.
For the retail tutorial project this is coginiti_retail_demo (from connection = { name="coginiti_retail_demo", ... }).
-
Click ⚙ icon (Admin Settings) in the bottom left corner
-
Expand Templates
-
Open Database Templates
-
Click the Add button to create a new template
-
Select your database platform (for the retail tutorial: Postgres)
-
Set the Connection name to match the connection name in
project.tomlexactly — for example,coginiti_retail_demo -
Fill in the connection parameters:
Host: your-postgres-host
Port: 5432
Database: retail_csl
SSL Mode: (as required by your environment) -
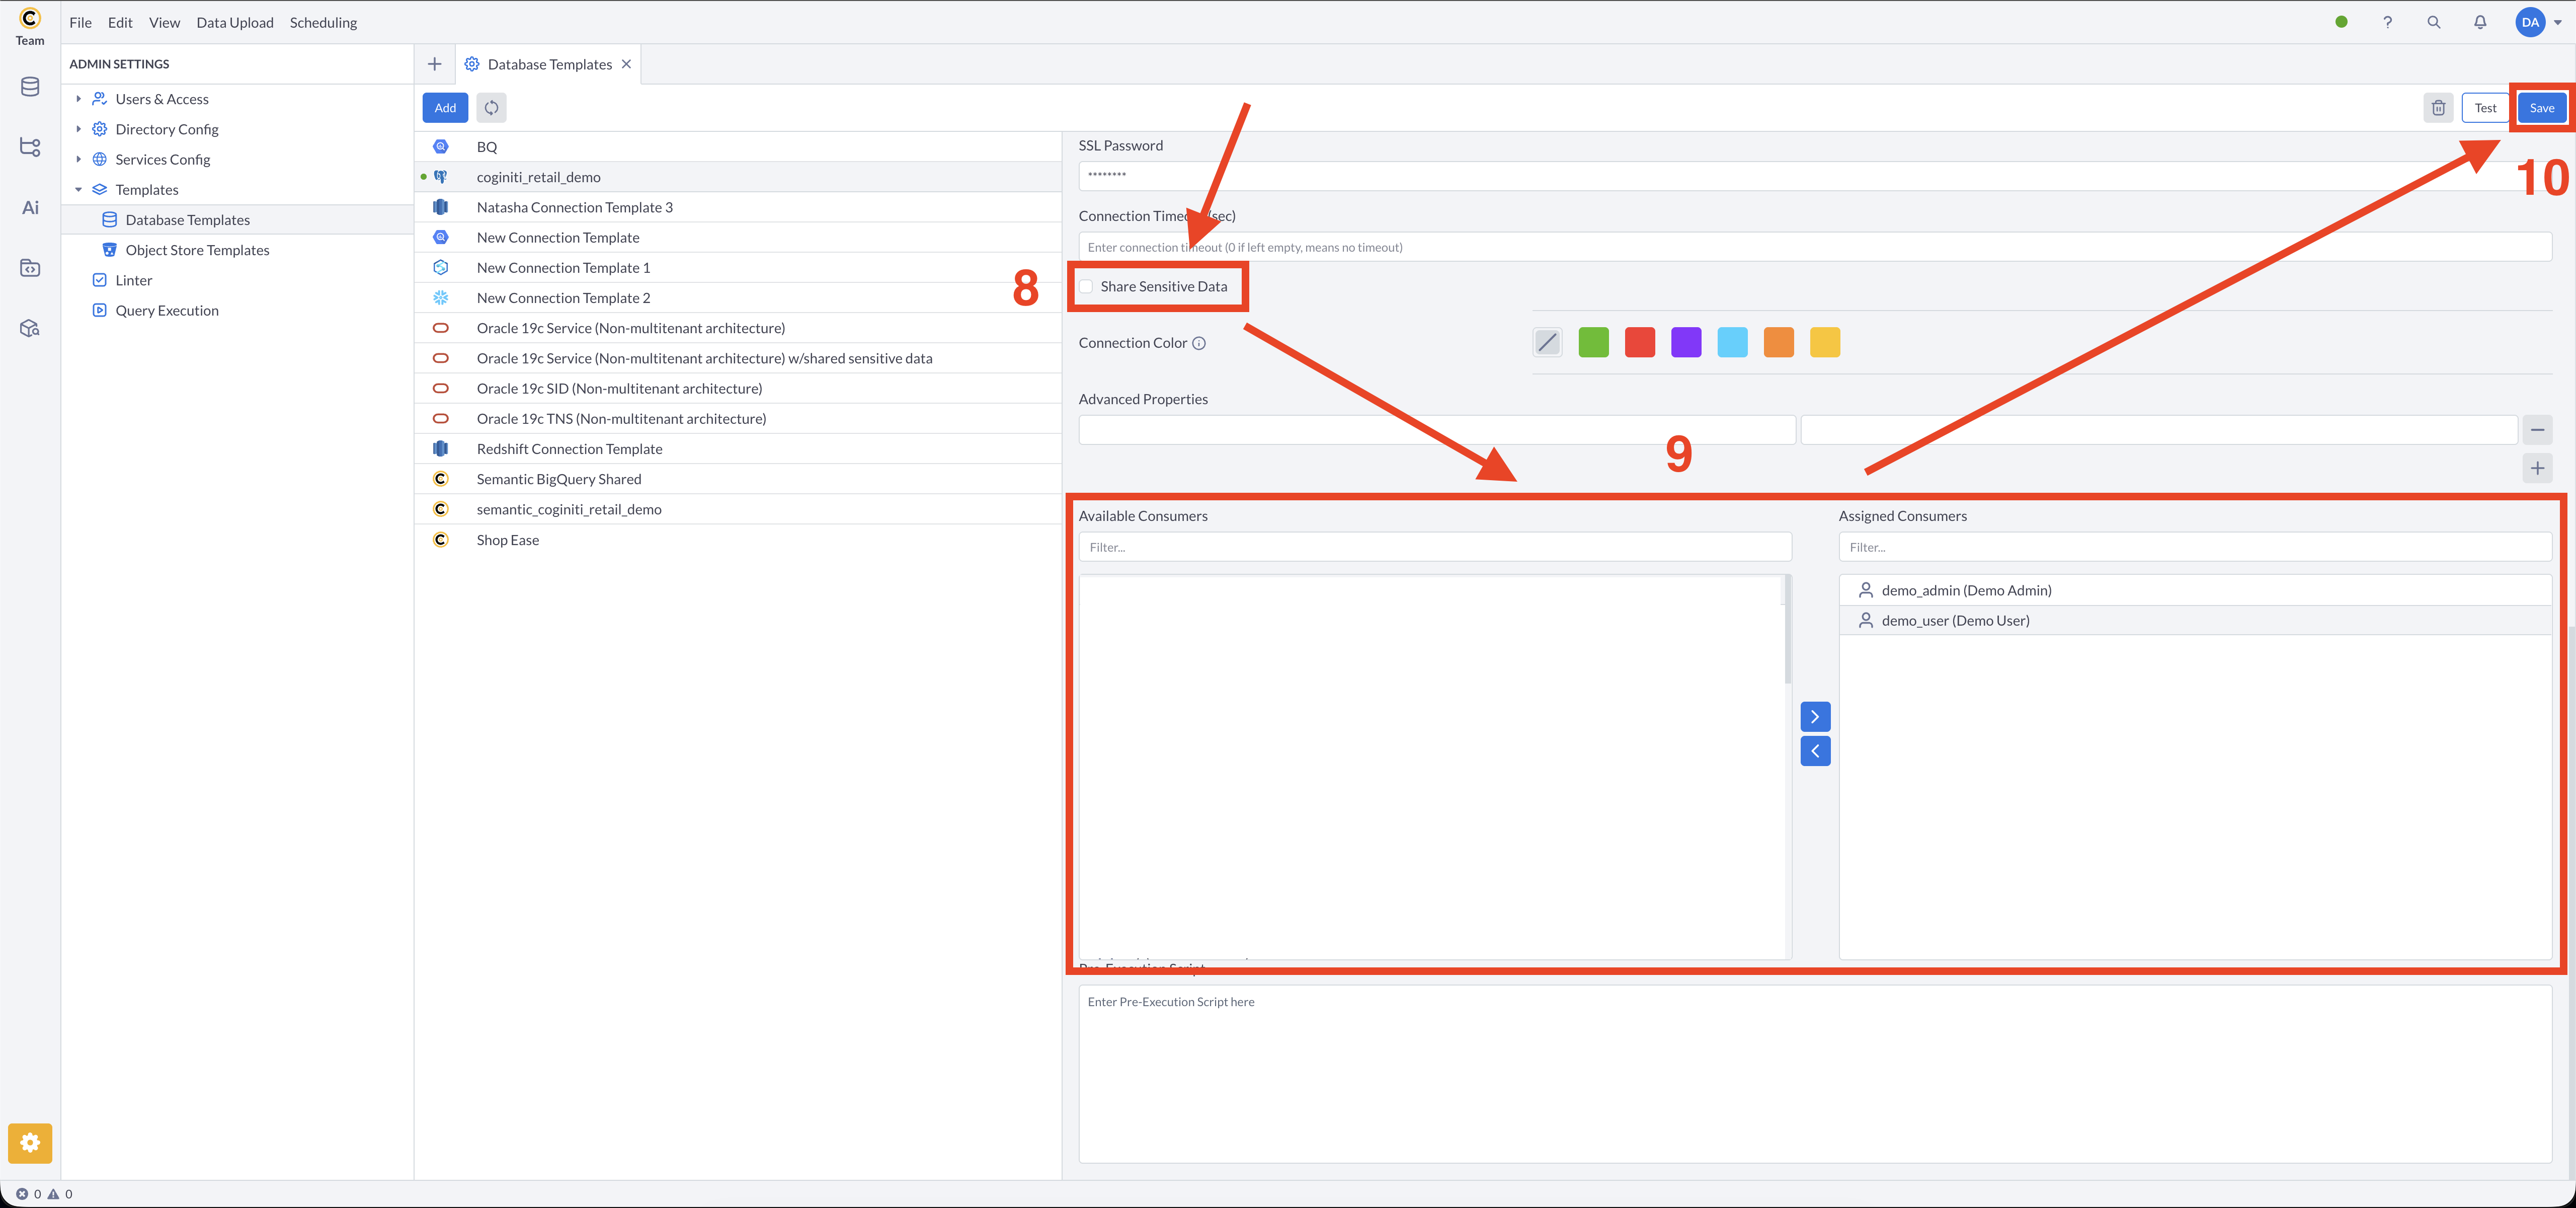
Configure credential sharing (Share Sensitive Data for a service account, or leave unchecked for individual user credentials)
-
In the Assigned Consumers section, add the users or groups that need access to this project
-
Click Save
Full connection template configuration guide: Managing Connection Templates
Step 4: Add a semantic layer connection template
Create a separate semantic layer connection template that points to your published project. This template tells Coginiti which project's semantic layer to expose to consumers.
-
Click ⚙ icon (Admin Settings) in the bottom left corner
-
Expand Templates
-
Open Database Templates
-
Click the Add button to create a new template
-
Select Semantic Layer as the connection type
-
Set the Connection name
-
Set the Project path to the location of your published project in Project Hub, using the project name from the
namefield inproject.toml:@Project Hub/coginiti.co/foundation/retailUse only the project name — do not include sub-folders or paths within the project (such as
/semanticor/semantic/customer). -
Optionally, select a specific semantic layer key from the project's
[semantic]section (if left empty, thedefaultlayer defined inproject.tomlis used), and needed Project Version (if left empty, the latest version will be used) -
In the Assigned Consumers section, add the same users or groups assigned in Step 3
-
Click Save
For connecting external BI tools to the semantic layer via JDBC: Connect to Semantic Layer via JDBC
Step 5: Verify access with a test user
Confirm the setup is working correctly by logging in as one of the assigned consumer users.
- Log in to Coginiti as a test user (one of the users you assigned in Steps 3 and 4)
- Verify the published project is visible in Project Hub
- Open Database Connections — the
coginiti_retail_democonnection template should appear in the list - Connect using the template and confirm the connection succeeds
- Navigate to the project in Project Hub and open a semantic reporting query (for example,
sales_overview) - Run the query — it should execute successfully against the semantic layer.
Do not forget to change the tab connection to your semantic connection template!
If the query fails, check:
- The DB connection template name matches the
connection.nameinproject.tomlexactly - The user is assigned to both the DB connection template and the semantic layer connection template
- The user has at least View access to the published project in Project Hub
See Coginiti Retail Project Complete Workflow Tutorial for a full end-to-end example of setting up and running the retail project.
For more information about other exciting Coginiti features visit our documentation